Contents
Contract Digitalization
ICI includes important capabilities to help you manage legacy contracts using Artificial Intelligence (AI). To manage them effectively, ICI supports:
- Converting legacy contracts (PDF and Images) into machine searchable documents
- Converting unstructured contracts into structured contracts by identifying the metadata attributes (including String, Data, Date, Email, Boolean, User, andLookup) in the contracts
- Identifying and extracting clauses from the contract
- Excel-based Bulk Upload capability that processes legacy contracts with attribute extraction in bulk
- Visual cues on AI confidence on extracted information in Excel
You can quickly find a relevant contract through powerful search on text or metadata, and analyze the presence or absence of clauses to identify hidden risks. You can also easily perform lifecycle actions such as renewal, terminate, amend and assign, as well as perform bulk actions to comply with changing regulations.
Create Attribute for Clause Discovery
In ICI, to manage legacy contracts using AI, you need to first create an attribute Clause Discovery Type. To do so:
1. Click Agreements > Create Agreement on the dashboard. The Create Agreement page opens.
2.Select Category. For example, Default.
3. Select Contract Type Name. For example, Legacy Sponsorship Types.
4. Select Type of Paper - Third Party.
5. Click Next.
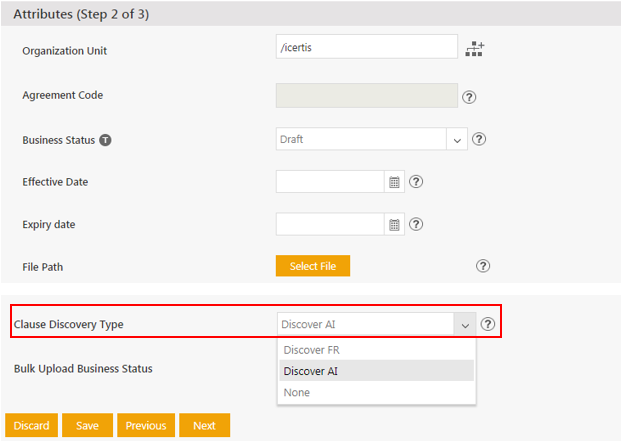
6. On the Attributes page, click Clause Discovery Type (which is a mandatory field).
7. Select Discover AI from the drop-down to use AI to discover the clauses.
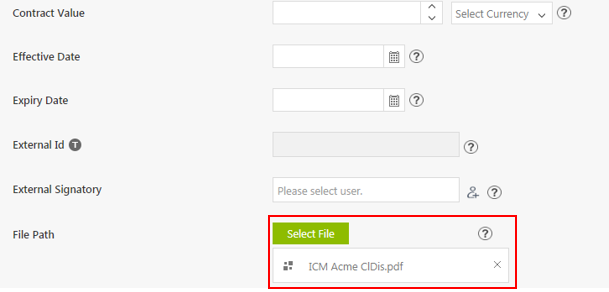
8. Click Select File in the File Path. You can select a PDF or .docx legacy file which you want to be discovered.
- Using AI, there will be a mapping of the attributes that you want to get discovered from the selected legacy file. For example, if the uploaded file with a Contract Value, that value will get discovered and populated in the Contract Value field.
- The attributes that you want to be discovered can also be configured.
9. Click Next.
10. On the Verify page, click Create and Publish.
The Details page will now display the following 2 additional tabs:
• Metadata Discovery: displays the metadata values of the discovered clauses from the uploaded legacy document
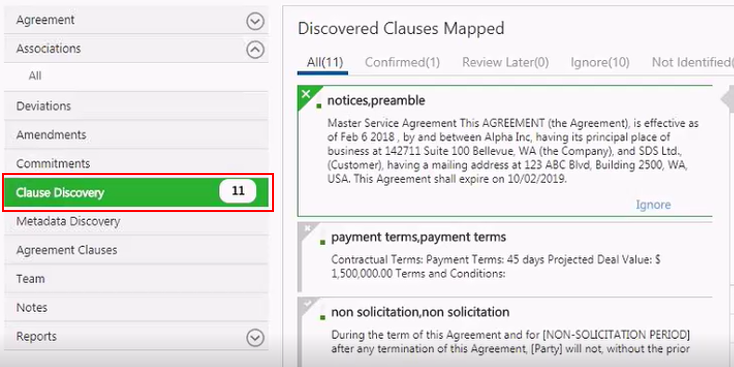
• Clause Discovery: displays the discovered clauses from the uploaded legacy document
11. Click the Metadata Discovery tab. The values that have been fetched from the uploaded legacy file are displayed. The best possible match will be displayed in each of the fields. The discoverable Metadata attributes include String, Data, Date, Email, Boolean, User, and Lookup. For the Boolean type of discovery, you can toggle Configured Attribute Field to Yes/No, as required.
Since the steps for adding any attribute are quite similar in nature, let’s consider the Lookup attribute as an example.
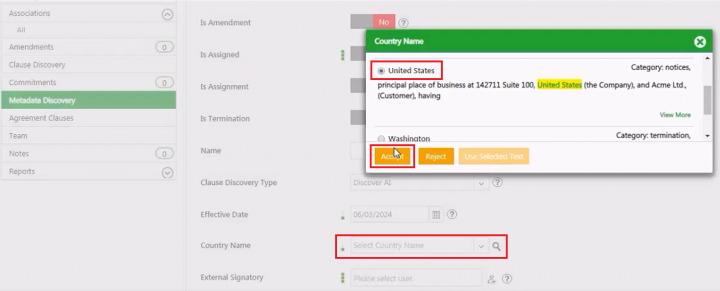
- For example, a Lookup Attribute, such as the Country Name, the options that were discovered from the uploaded document are highlighted in the screenshot below. Select the desired option as United States.
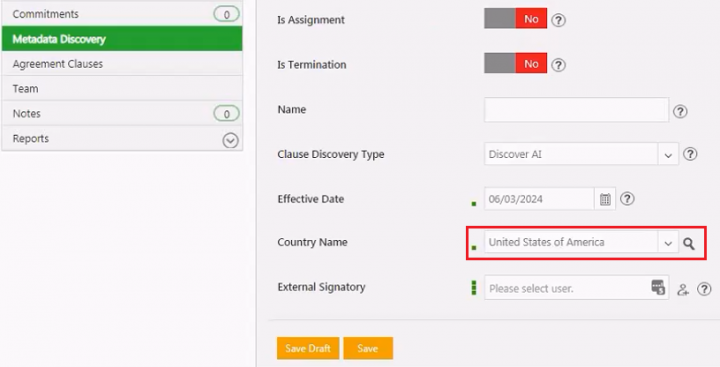
- The selected option which comes from Discover AI is then filtered in the Masterdata entities and when accepted, the selected value gets added to the Lookup (metadata field) on the Metadata Discovery tab of the Details page.
12. Click the View potential matching values icon. The best potential matching values, based on the confidence level (3 being the highest confidence level) are displayed. A popup opens which displays the values fetched from the legacy file. (For example: Icertis solution).
13. Click Show More to display all the other relevant matches. You can select a value from this list.
14. Click Save to save to the database of ICI or click Save As to save to the AI database.
A popup Data has been saved successfully is displayed.
15. Click the Clause Discovery tab.
You can sort a long list of discovered clauses that are mapped to Attributes in following two ways, allowing you to quickly focus on specific items that match your sort criteria:
- Document Order: This is the default and the clauses are displayed in the sequence in which they appear in the uploaded document.
- Confidence Score: The discovered clauses are displayed based on their confidence level, derived from the built-in AI logic. There are 3 levels of confidence, with the highest confidence level being listed first.
By a technical configuration, you can restrict the number of matches to be displayed in the Matched Library Clauses section on the right hand side of the Clause Discovery tab of the Details page. By default, the 5 best matches are displayed based on the maximum length of the matches and their confidence level.
The discovered mapped clauses can be filtered using the following categories:
- All: displays all clauses that are discovered from the uploaded legacy file
- Confirmed: displays clauses that you select to be confirmed by clicking the Confirm tab for the matched library clauses
- Review Later: displays clauses that you may want to review later by clicking the Review Later tab for the matched library clauses
- Ignore: displays clauses that you select to be ignored
- Not Identified: displays clauses that are present in the discovered clauses list, but are not identified. You can preview and confirm these later, if needed.
- Relevance Score: A relevance score of 80 % indicates that it is an 80% match.
17. Click More / Compare. Show More displays more options. Compare allows you to compare both sides.
18. Click Confirm. A deviation analysis is done.
Downloading Matched Clauses to Excel
The Clauses from the uploaded document are discovered and extracted. These discovered clauses will appear on the Clause Discovery tab of the Details page.
These clauses can be exported to Excel for convenient offline reviews as follows:
1. Click Export Clause Data to display specific columns you would like to export to Excel. For example:
- Discovered Clause Category
- Discovered Clause Text
- Matched Clause Category
- Matched Clause Text
- Status – this is the status in the AI. For example, Confirmed.
Complete end-to-end processing including Validation, Upload/Create Contract (Web)
You can process a bulk upload contracts end-to-end. This includes validation and creation of the contract, thus making it easier to manage contracts.
For a bulk upload, you need to create the following two Excel files:
- Data: This file includes information in the same format that we want it to be represented in the ICI UI, so that we have a record there. The Clause Discovery is done by the AI and the status of the bulk upload is always Executed.
- Metadata: This file includes the metadata of the Contract Type that you have defined and saved in the Excel format.
To perform a bulk upload:
- In a .zip folder, place the Data and Metadata Excel files along with the legacy document. Name the folder.
- Click the Select Batch File button. Select the .zip folder.
- Click the Submit button. A validation message File Updated Successfully is displayed.
- Click the Refresh button to check if the validation process has begun or not. The status changes from Not Started to In Progress.
- Click the Refresh button. The status changes to Needs Validation.
- Click the Validate button. The Excel file containing the metadata is downloaded.
- Click the Finalize button, an AI logic is run and the value that was uploaded in the document which has been fetched is given in the Excel. It then takes the amended Excel and creates the executed contracts as a batch process from the finalized attribute values. If an incorrect file is uploaded, an error message is displayed.
On completion of the batch process, the status changes to Completed.
You can also configure the extracted Excel document to be color coded linked to the confidence level. The colors - Green, Yellow and Red denote the most, medium and least confidence levels respectively, making it easier to identify them instead of having to search through all the options.
Related Topics: Create Agreement | Managing US Federal Contracts using ICI | DiscoverAI | NegotiateAI | ObligationAI | VisualizeAI

