Contents
- 1 Clause Management
- 1.1 Searching a Clause
- 1.2 Addition of action buttons on the Deviations tab
- 1.3 Ability to define additional clause group under clause entity
- 1.4 Creating a Clause
- 1.5 Approving/Rejecting a Clause
- 1.6 Editing a Clause
- 1.7 Accessing Control on Clauses
- 1.8 Configuring Rules for Inclusion/Exclusion of Clauses
- 1.9 Comparing Clauses
- 1.10 Replacing Clause Text from ICI
- 1.11 Support for extended clause metadata
Clause Management
A Clause is a distinct article or provision in a Contract or Agreement, or other formal or legal written documents. In ICI, you can create new Clauses for various Contract Types, and use these Clauses while creating Templates.
Using the Clause Management feature, you can perform the following tasks:
- Search a Clause
- Create a Clause
- Approve/Reject a Clause
- Edit a Clause
Searching a Clause
In ICI, you can search an existing Clause for multiple reasons such as:
- To know the details of the Clause.
- To know the status of the Clause.
- To edit an existing Clause.
- You use multiple parameters to search an existing Clause.
- To search Agreements and Amendments based on Clause usage.
In ICI, you can use various options given below, including the dynamic search feature, to find the desired Clause.
Option 1:
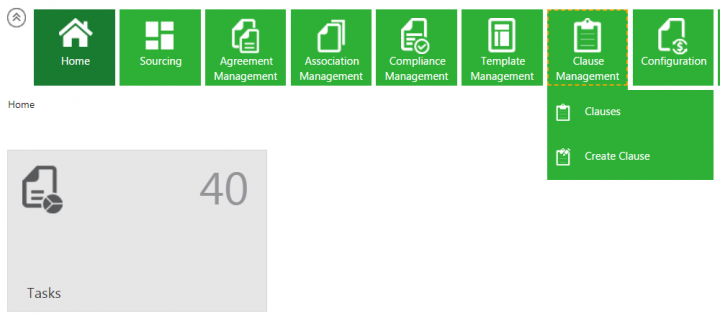
1. Click the Clause Management tile on Home page. The Clause Management page opens.
2. Search for a specific clause by using any of the following options:
- Under Categories, click the Select Field list, and then select an appropriate item. Search results relevant to the item (that is selected field) are displayed with a number in the bracket. The number denotes the number of clauses that meet the search criteria.
- Select the checkbox to select a specific item. A list of clauses relevant to the item is displayed. To refine your search further, type the relevant keyword in the Custom Keyword box, and click Apply.
Option 2:
Alternatively, type the keywords in the box provided above the list of clauses. A list of relevant clauses is displayed.
You can further narrow your search by using any of the following methods:
- "..." - Type the search term in double quotation marks. It shows existing clauses that include the exact search term.
- ...* - Type the search term in star characters. It shows existing clauses that include the exact search term.
- ... - Add a Prefix * to the search term. It shows existing clauses that end with this term.
- ...* - Add a Suffix * to the search term. It shows existing clauses that start with this term.
Viewing the saved search terms
View your saved search terms with the following:
- In the More Searches box, select your saved search, and click Add to Favorites icon to mark the search term as favorite.
- You can find your marked favorites below the tiles.
Users can also search and retrieve clauses with extended attributes as search parameters from Clause index page search, Advanced Search, Global Search andSaved Search. Extended attributes are available in search facets drop-downs along with regular attributes.
Searching Agreements and Amendments based on Clause usage
ICI allows searching of Agreements and Amendments based on Clause usage and using Advanced Search. This allows users to prioritize the Agreements they plan to work based on Clause usage, thus being able to tackle high-risk Agreements first and mitigating risks.
You can now search and filter Agreements using the following Clause categories: Clause Group, Clause Language, Clause Name, Is Alternate Clause, Is Dependent Clause, Is Deviated, Is Editable, Is Mandatory, Perform Deviation Analysis, Primary Clause, and Clause Code.
Agreements
Let’s search Agreements where Clauses have deviated, and approvals are pending from Deviation Approvers using Clause categories.
To search Agreement where Clauses have deviated:
1. Click the Agreement Management tile on the Home page. The Agreement Management page opens.
2. Enter a category or select one from the Categories drop-down. For example, Document Clauses: Is Deviated.
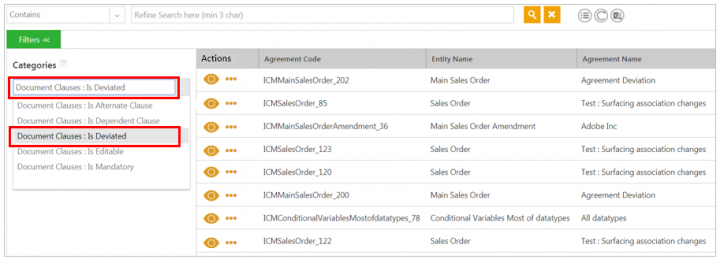
3. Select the checkbox for true to search Agreements with deviated Clauses.

To search Agreements where the Status is Deviation Approval Pending:
4. Enter a category or select one from the Categories drop-down. For example, Team Member: Role Name.
5. Select the checkbox for DeviationApprover to view the Agreements where approval is pending from Deviation Approvers. All Agreements where the Status is Deviation Approval Pending are displayed.
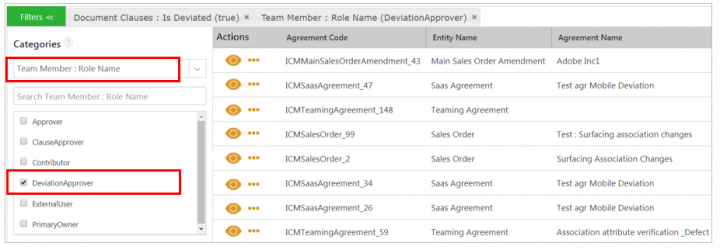
6. Click the View Record icon next to the Agreement you want to select. The Agreement Details page opens.
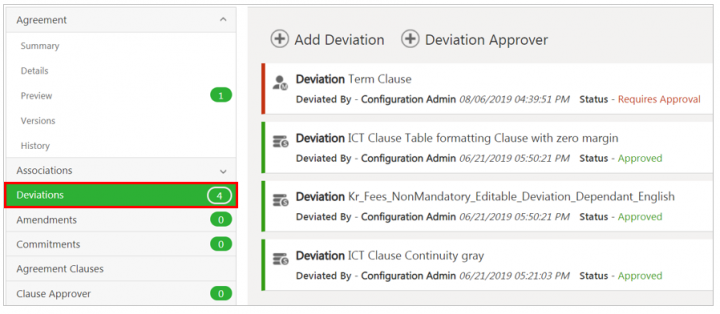
7. Click the Deviations tab to view the Deviation Status in Clauses for the selected Agreement.
Addition of action buttons on the Deviations tab
The ApproveAll, RejectAll and ClearAll buttons have been added on the Deviations tab of the agreement Details page to approve, reject or clear the selected deviations respectively.
This makes it easier for the user to take actions on multiple deviations of the agreement in one go, considerably reducing the effort of approving, rejecting or clearing each one individually.
Deviated Clauses
To view or add deviations for clauses:
1. Click the view record icon on the Agreement Management page. The Details page opens.
2. Click the Deviations tab.
3. Click the plus icon next to Add Deviation to manually add deviations to the agreement’s clauses. The Add Deviation window opens.
- Click the search icon to select and add the deviated clause.
- Enter the text for the deviated clause.
- Enter your comments for the deviated clause.
- Click Save.
4. Click the plus icon next to Deviation Approver to manually add approvers for your deviated clauses.
5. Click the Send for Approval button.
- Click
 to view the comments provided by other users in the team or other stakeholders.
 - Click
 to open the Deviation Details window. It displays the standard clause text, the deviated clause text and the comments provided by other users. You can add your own comments too.
 - Click
 to remove a deviation.
Note:
- Only deviations that are added manually can be removed. If deviations have been added by downloading the agreement and then uploading the agreement back to ICI, those deviations cannot be removed.
- Deviation approvers can also be added by defining rules from the Rules page.
- The Primary owner can send the reviewed agreement to the Deviation Approver. As a Deviation Approver, you can approve or reject clauses inside the agreement if a Deviation Approver role is assigned to you.
6. Clicking the Send for Approval button in Step 5 enables the Approve, Reject, Approve All, Reject All and Save Changes buttons. The Clear All button will be enabled when an action is taken on any deviated clause. Only the Deviation Approver can view these buttons.
- Approve: Click to approve each individual clause.
- Reject: Click to reject each individual clause.
Clicking the Approve and Reject buttons opens the Deviation Details window, displaying the details of the clause. You can also put in your comments in the Comments box. You do not have to click Save Changes to save your comments; they will be saved automatically.
- To approve or reject deviations in one go, click the Approve All or Reject All button.
In the above example, as we have already selected one clause for approval and one clause for rejection, clicking Approve All or Reject All will select the remaining 2 clauses (i.e. clauses that are not already selected). You can also add a common comment for the clauses. Comments will not be saved until you click the Save Changes button.
- Clear All: Clears all selections.
- Click Save Changes to save your changes.
The clauses that have been approved will have the status Approved, whereas the ones that have been rejected or no actions have been taken will have the status Requires Approval.
</div>
To search for Amendments:
1. Click the Agreement Management tile on the Home page. The Agreement Management page opens.
2. Enter a category or select one from the Categories drop-down. For example, Is Amendment.
3. Select the checkbox for true to filter the list for Amendments.

4. Enter a category or select one from the Categories drop-down. For example, Document Clauses: Legal.

5. Click the View Record icon next to Amendment for which you want to view the Clauses. For example, ICISaasAgreementAmendment2.
6. Click the Agreement Clauses tab to view all Clauses in the selected Amendment.
7. Click Show Clause Information to view the selected Clause details. The Clause Details window opens displaying the Clause information.
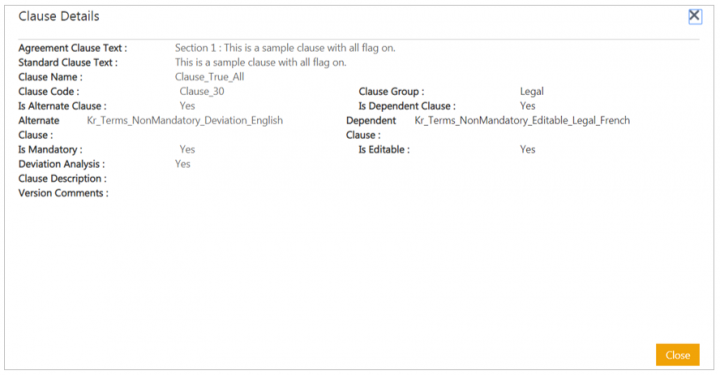
Using Advanced Search
To search Agreement and Amendment using Advanced Search:
1. Click the Search icon at the top right corner of the Home page. The Search page opens.
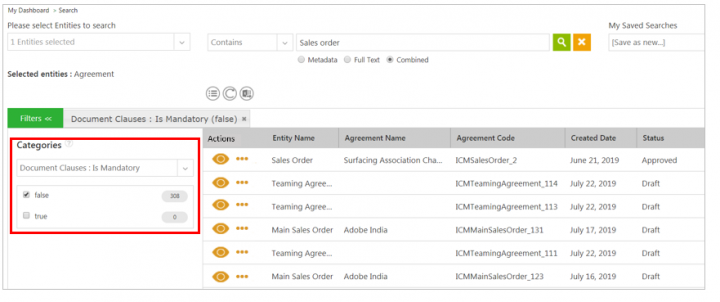
2. Enter the search criteria in the Refine Search here field to display all Agreements based on the search criteria. For example, Sales order.
3. Select a type of search (Metadata, Full Text or Combined). For this example, let’s select Combined.
4. Enter a category or select one from the Categories drop-down. For example, Document Clauses: Is Mandatory.
5. Select the checkbox false to view Agreements where this Clause is not mandatory.
Ability to define additional clause group under clause entity
- Define and update clause groups.
- Edit, delete, activate or deactivate clause group entities.
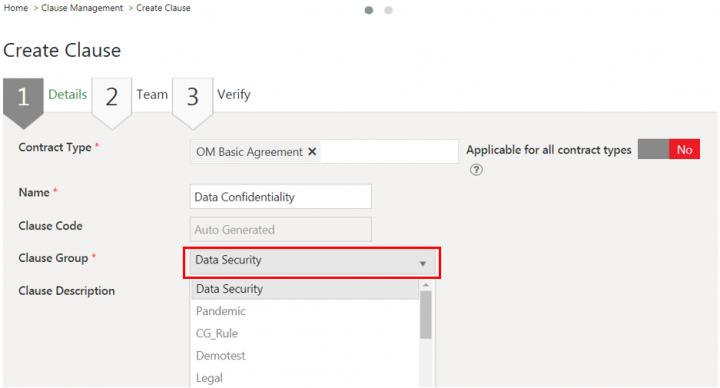
- View additionally added clause group values in the clause entity when creating or editing a clause.
- Search agreement records or clauses on the index page on clause group attributes with added values.
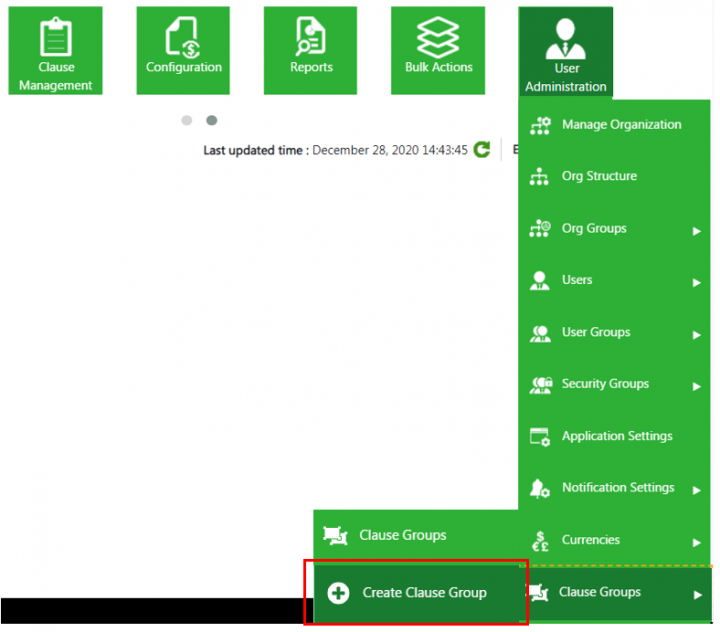
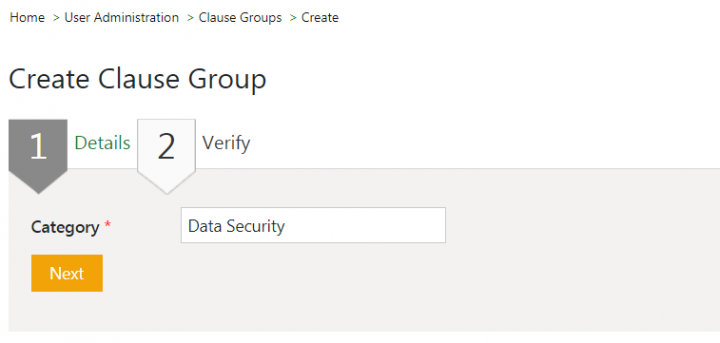
1. Go to User Administration > Clause Groups > Create Clause Group on the Home page. The Create Clause Group page opens.
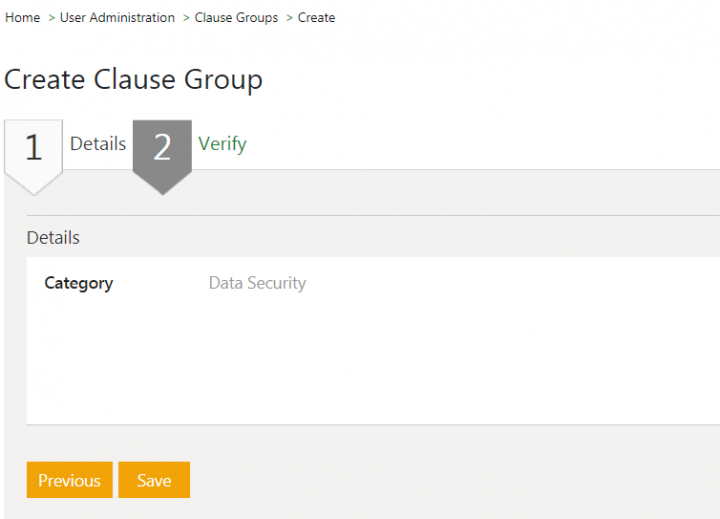
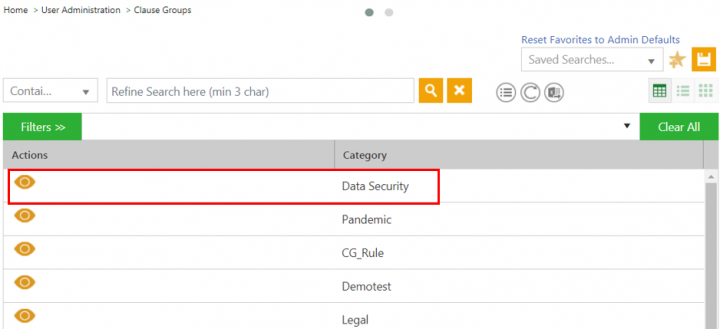
4. Click Save. The page reloads and the Clause Groups index page opens, and the latest created clause group is displayed in the list.
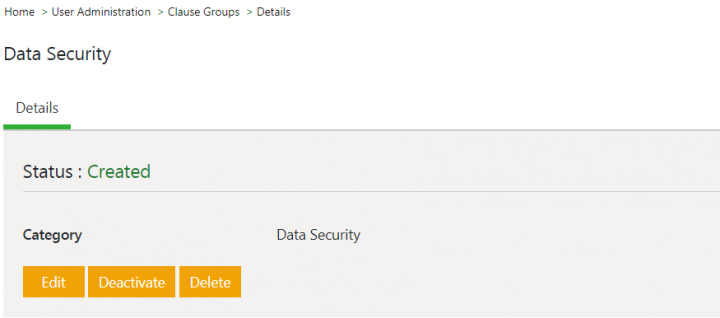
5. Click the view record icon in the Actions column for the newly created clause category. The clause group Details page opens.
- Edit: Click to edit the clause group name. For example, Data Security can be renamed as Data Security 2021.
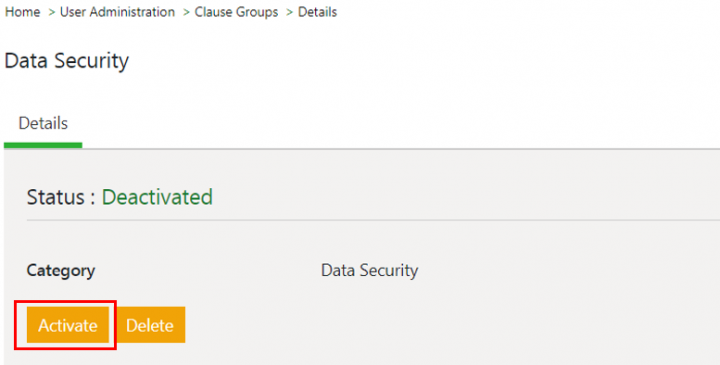
- Deactivate: Click to hide the created clause group from appearing in the Clause Group drop-down. The status of the clause group changes to “Deactivated” and the Activate button is displayed. A deactivated clause be activated using the Activate button.
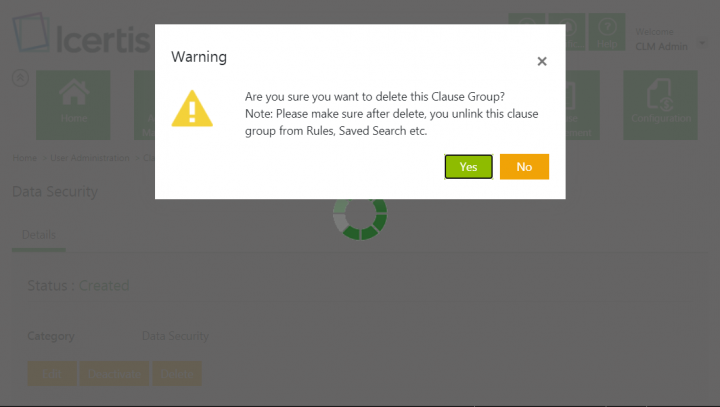
- Delete: Click to delete the clause group in Created state. A warning message “Are you sure you want to delete this Clause Group? Note: Please make sure after delete, you unlink this clause group from Rules, Saved Search etc.” is displayed.
- Click Yes to continue deleting the clause group.
- In case of a clause group in Deactivated state, a validation message is displayed, for example “Clause Group Data Security is linked to one or more Clause(s). To delete it, unlink from dependent clause(s).”
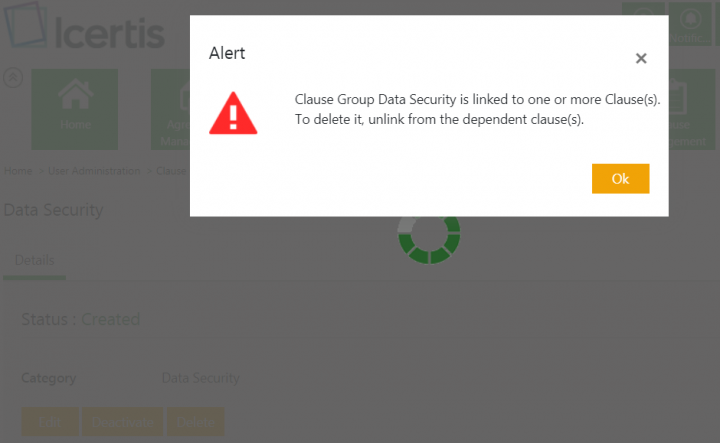
Unlink the clause group from dependent clause(s) and repeat the steps for deletion to complete the process. A success notification will be displayed.
Note:
Deleted clause groups need to be delinked from any existing rules, saved searches and so on.
A deactivated clause group will still appear as the clause group for any clauses created while it was active. However, no new clauses can be created using a deactivated clause group.
Clause groups can be searched using the “Clause Category” filter in Global Search.
The clause group creation and search functionality is only available to Administrators.
Creating a Clause
You can create new Clauses for various Contract Types as per business requirements. You can use these Clauses while creating Templates and further in Agreements.
To create a new Clause:
1. Click the Clause Management tile on Home page. The Clause Management page opens.
- Details
- Team
- Verify
Let us go through each of the tabs in detail.
Details
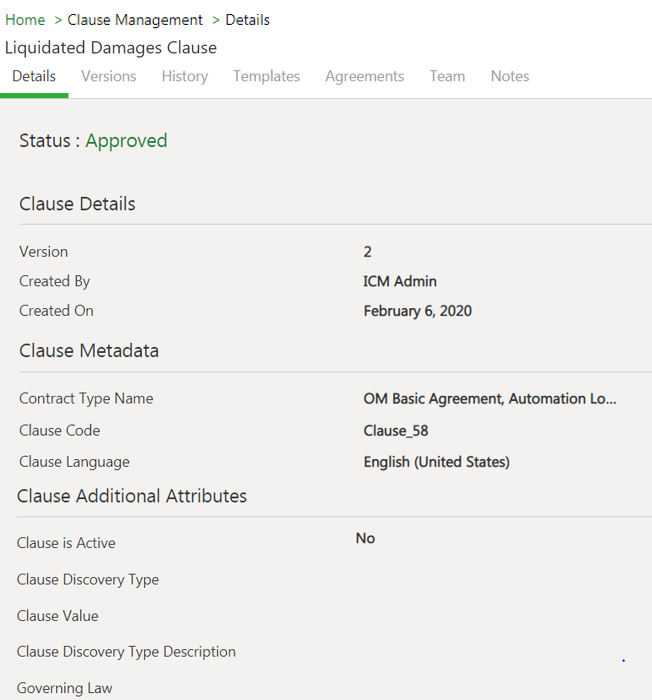
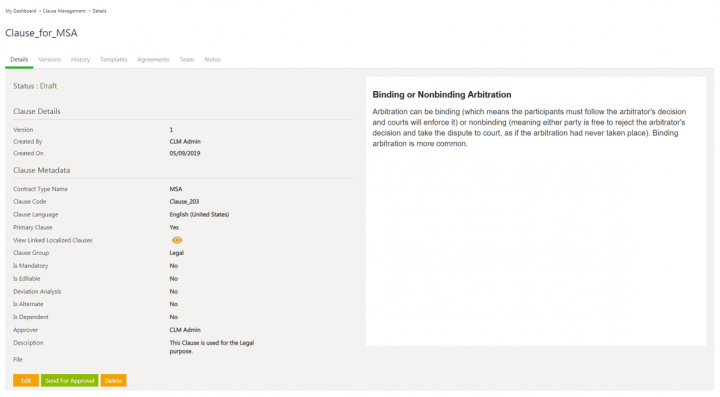
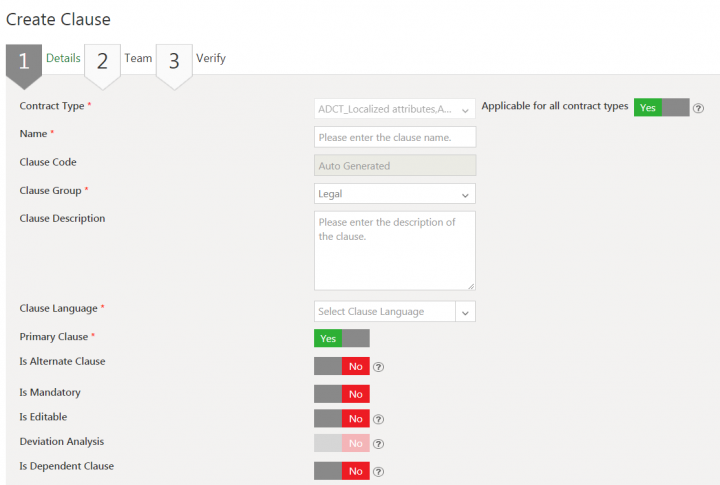
The Details section consists of metadata for the clause. The extended attributes are available under Clause Additional Attributes section if configured in your instance.
- Contract Type: Select the Contract Type for which you want to create a Clause.
- Name: Type the name of the Clause.
- Clause Code: It is a system generated code that auto-populates after the Clause is generated.
- Clause Group: Select the Clause group in which you want to place the Clause.
- Clause Description: Type the description of the Clause.
- Clause Language: Select the language of the Clause.
- Primary Clause: Select Yes or No depending on whether the Clause is primary or not. If you select No, select the linked primary Clause (the primary Clause to which the current Clause is linked).
- Linked Primary Clause: Select the Clause to which the current Clause is linked.
- Is Alternate Clause: Select Yes or No depending on whether the current Clause is an alternative option to another Clause. If you select Yes, the Select Clause list opens. Select the appropriate Clause.
- Is Mandatory: Select Yes or No depending on whether the Clause is mandatory for the selected Contract Type.
- Is Editable: Select Yes or No depending on whether you want to make the Clause editable. When you select Yes for the Is Editable field, the Deviation Analysis field is enabled, as you may want to track the deviation after the Clause is edited.
- Deviation Analysis: Select Yes or No depending on whether you want the system to track the deviations. If you select Yes in the Deviation Analysis field, any change in the Clause by the reviewer is displayed as a deviation from the original Clause. If a Clause is changed during the review, the Agreement in which it is used has to go through the deviation approval process.
- Is Dependent Clause: Select Yes or No depending on whether the clause is dependent on another clause. If you select Yes, the Select Clause list opens. In the Select Clause list, select the appropriate Clause.
- Clause Text: Type the Clause text that makes the content of the Clause. You can also use the desired attribute from the Attributes list that opens on the right. You can format the Clause content by adjusting font, font size and so on.
- File: Write the Clause in a word file and upload the word file by clicking the File Upload button.
- Version Comments: Type the comments related to the Clause, if any. Version comments help in tracking the changes made to the clause in every version.
3. Click Next. The Team section opens.
Team
To add users in the team: Click the Add User icon. The Add User window opens.
- Select the role of the use from the Select Role list.
- Click the desired tile to select a user from the list.
- Click Add. The user with their role opens in the Team tab. You can click the Cancel icon to remove the user from the list.
- Click Next. The Verify tab opens.
Verify
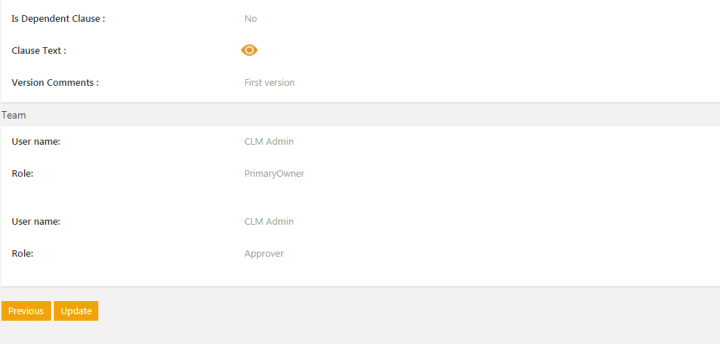
This tab displays all the details of the Clause you want to create. Verify tab displays two buttons.
Choose one of the following:
- Click Previous if you want to go back and make changes to the information that you have entered.
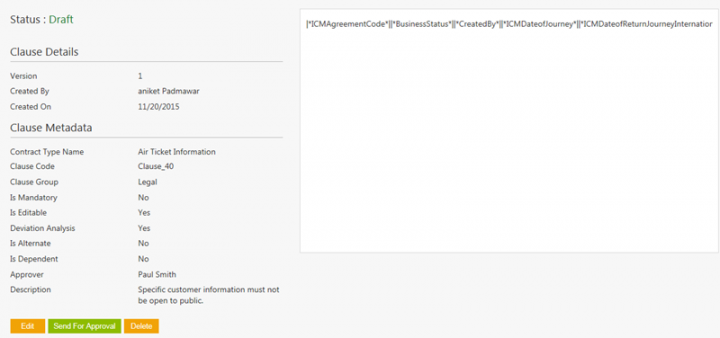
- Click Create to create the Clause. The Clause opens with the Draft status.
Note: Fields marked with * are mandatory.
4. After creating a clause, choose from the following three options:
- Edit: to make changes to the Clause.
- Send For Approval: to send a Clause to an assigned approver.
- Delete: to delete the Clause.
Approving/Rejecting a Clause
Sending a Clause for Approval
When you create a Clause, the status of the Clause opens as Draft. The Clause must be approved in order to get finalized.
To send a Clause for approval:
1. Click the View Record icon next to the clause you want to send for approval. The Clause Details page opens.
2. The Clause Details page consists of following buttons.
- Edit
- Send for Approval
- Delete
3. Click Send For Approval. The Clause is sent for approval, and the status of the Clause changes to Waiting For Approval.
Approving or Rejecting a Clause
Every Clause has a team consisting of a primary owner, a secondary owner, an approver, and so on. Approver has a right to approve or to reject a Clause.
To approve a Clause:
1. Click the Tasks tile on Home page. The Tasks page opens.
2. Click the appropriate link to open the Clause Details page for approving or rejecting a Clause.
3. Click one of the following buttons:
- Edit: Click to edit the Template
- Approve: Click to approve the Template
- Reject: Click to reject the Template.
4. Click Approve.
5. Type the appropriate comments in the Add Note window and then click Add.
The status of the Clause changes to Approved which is the final status of a Clause.
Editing a Clause
With ICI, you can edit a Clause at any state. For example, you can edit a clause that is approved. However, you have to approve the Clause again.
If you edit a Clause in the Approved state and update the same, the status of the Clause changes to Draft.
Then the clause needs to go through an approval process again.
To edit a Clause:
1. Click the View Record icon next to the Clause on the Clause Management page to edit a particular clause. The Clause Details page opens.
2. Click Edit. The Edit Clause page opens.
3. Edit the data in the required fields, and click Next. The Team section opens.
4. Complete the required steps under the Team tab and click Next. The Verify section opens. The details of the Clause you want to update are displayed.
- Click Previous to go back to previous tabs.
- Click Update to update the clause. The Contract Summary page opens.
6. Choose any of the following options:
- Edit to make changes to the Clause.
- Send For Approval to send the Clause to an assigned approver.
- Delete to delete the Clause.
Accessing Control on Clauses
The access and visibility of Clauses are restricted through a technical configuration in the following ways: *By restricting access control to the ICI Clause Library based on the Organization level or by adding the user to a Clause Team based on User Groups. This allows the Administrator to selectively provide view access as compared to all users having access to the Clauses tab being able to view and access all clauses in ICI’s Clause Library. So, if a user is not part of Clause Team, only the Clause tile will be displayed but clauses will not be visible to the user even though View privileges have been given in the Security Group. *By provisioning Event Rules by adding members to the Clause Team thus saving the time of manually adding users to the Team. You can now define conditions on Clause entity attributes such as Clause Created, Clause Updated, Clause Sent For Approval, Clause Approved, etc. *By providing support for the Observer role in the Clause Library and giving read only access using Role Action Mapping for Clause Entity. *By providing Clause Team-based access filtering at the Template and Agreement level using Word Add-in (.Net and .JS). When editing an Agreement, the clauses are displayed on the Agreement Clauses tab, Parent Agreement Clauses, Library based on the configuration.
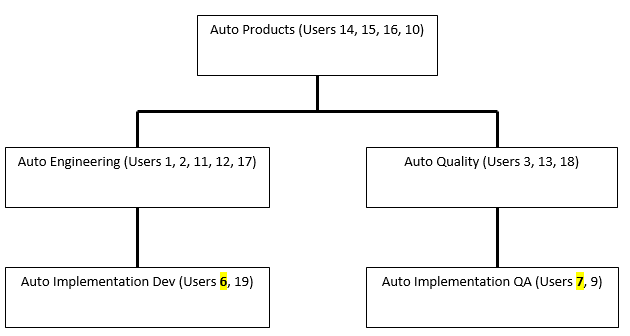
Let's consider an example of Access Control on Clauses using the Organization path screenshot below: As User 7 creates the following primary clauses – Clause 01, Clause 02, Clause 03 and Clause 04. To do this:
1. Click the Clause Management tile on the Home page.
2. Click the Create Clause tile. This opens the Create Clause page.
3. Enter the details for the Clause: *Enter the Name of the Clause. For example, Clause 01. *Enter the remaining details for the Clause.
4. Click Next. This opens the Team tab.
5. Add a member to the team by clicking the Add icon.
6. Click Next. This opens the Verify tab and verifies the Clause details on the page.
7. Click Create to create Clause 01. This opens the Clause Details page with a preview of the Clause document.
8. Click the Send for Approval button to send it for approval. The Clause will be listed on the Clause Management Index page.
9. Similarly, create Clause 02, Clause 03 and Clause 04 as primary clauses. All users in Auto Products, all users in Auto Quality, and all users in Auto Implementation QA can access all the clauses.
10. Add User 6to the Team in one of the following ways: *Add User 6 as an Observer to the Team and give access to Clause 01 and Clause 03. User can search and view these Clauses, but cannot make any updates to them. *Add User 6 as a Contributor to the Team and give access to Clause 01 and Clause 03. User can now search, access and make updates to these Clauses now. *Add User 6 to the Team by provisioning Event Rules. You can now define conditions on Clause entity attributes such as Clause Created, Clause Updated, Clause Sent For Approval, Clause Approved, etc.
Let’s consider the same example as above, User 6 can also create a Template for the same Contract Type in ICI or using Word Add-in:
1. Create a Template using Word Add-in.
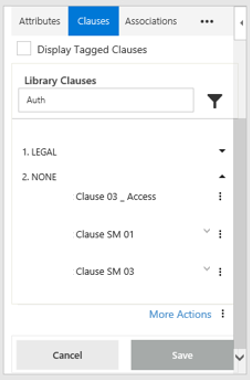
2. Click the Clauses tab.
3. Enter a search criterion in the Library Clauses field. The Clauses accessible to the user are listed.
4. Preview the Template. Clauses are listed depending on the Rule based conditions.
Creating an Agreement using the Template created in Word Add-in:
1. Create an Agreement using this template. User 6 can see the entire Agreement even though access to Clause 02 and Clause 04 is not given.
2. Click the Agreement Clauses tab. All clauses are visible as they are not access controlled at the Agreement level.
3. Click Show Clause to view the clause information.
4. Download the Agreement. User can see all the Library Clauses, Agreement Clauses, and Parent Agreement Clauses.
5. Add an Alternate Clause to Clause 04.
User 6 cannot see this clause as Clause 04 is a primary clause, hence the user who does not have access to the primary clause will not be able to see the Alternate Clauses. However, the Alternate Clauses are still visible on the Agreement Clauses tab.
Configuring Rules for Inclusion/Exclusion of Clauses
You can configure Rules to include or exclude Clauses from an Agreement. You can also configure the addition of a Clause Approver to the Team to identify and approve additional requests when a Clause is included or excluded from the Agreement. This allows users to define deviation approval Rules to support Clause inclusion or exclusion from an Agreement that can be tracked throughout the workflow. The following conditions apply to this feature:
- The Clause Approval Rule is only evaluated for Edit and Upload actions *For Clauses added systematically, Rule does not trigger the inclusion Rule
- The Clause Approvers can be added based on a Rule; they cannot be added not manually
- The Clause Approval Rule is evaluated by comparing the Agreement with the previous version (the first version does not get evaluated)
- The Clause Approval Rule is evaluated until the Agreement is approved
To include a Clause from an Agreement:
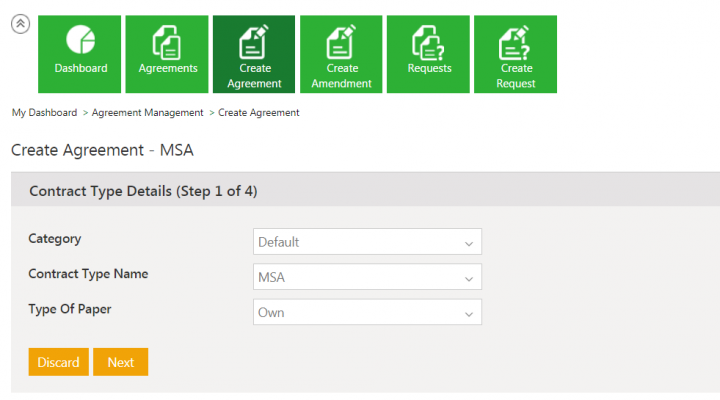
1. Create an Agreement. For example, MSA.
2. If we want to create an inclusion Rule for an External Signatory, click the Add User icon to select the External Signatory on the Attributes page.
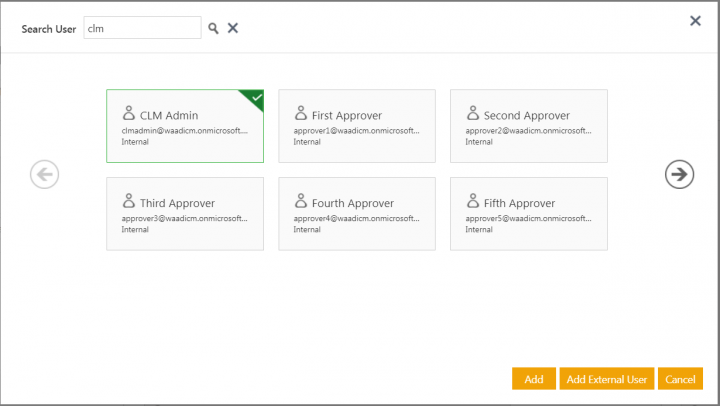
3. Search User in the Users window and click the Add button. For example, CLM Admin.
4. The Attributes page opens displaying the added user in the External Signatory field.
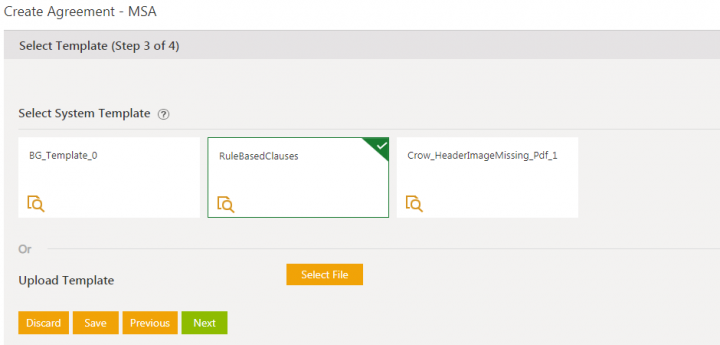
5. Click Next. The Select Template page opens.
6. Select the RuleBasedClauses template.
7. Click Next. The Create Agreement page opens.
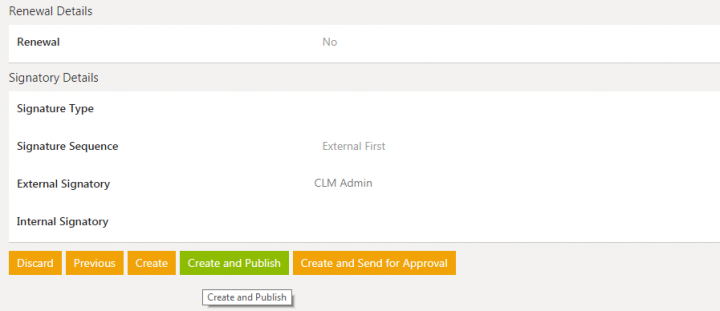
8. Click Create and Publish to create the Agreement. The Agreement Details page opens.
9. Go to the Home page and click the Configuration tile.
10. Click the Rule tile to add a Clause Inclusion Rule for an Approver.
11. Click the Contract Type. For example, MSA.
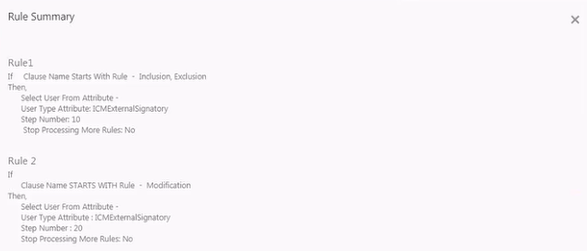
12. Select the Rule to view the Rule Summary.
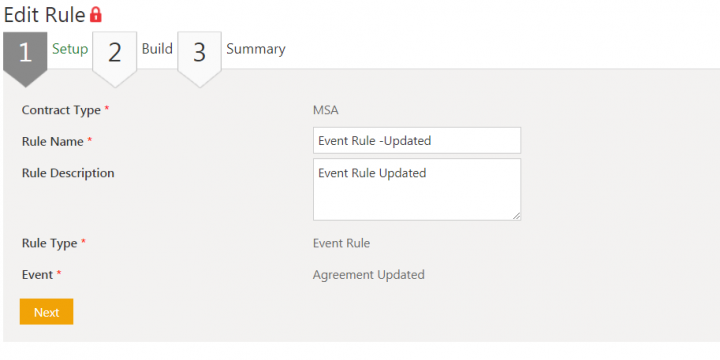
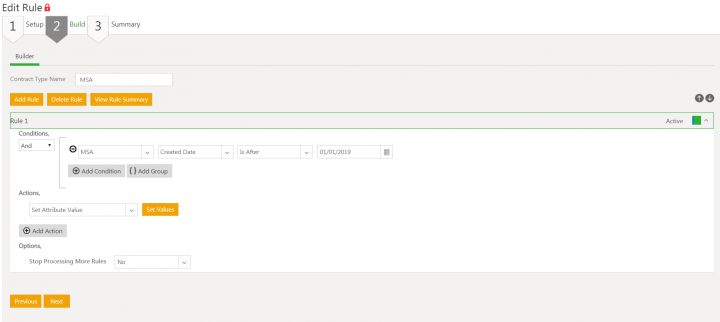
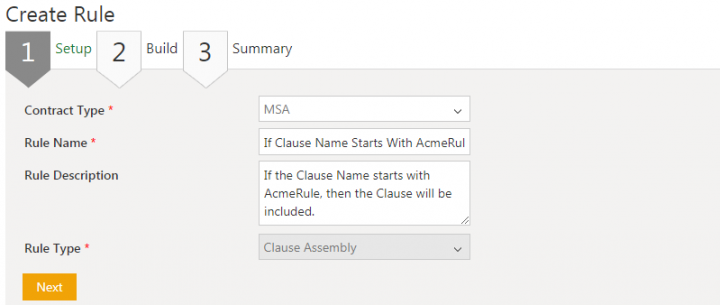
13. On the Create Rule page, select the Contract Type, add the Rule Name (for example, If Clause Name Starts With AcmeRule), Rule Description, and the Rule Type (for example, Clause Assembly).
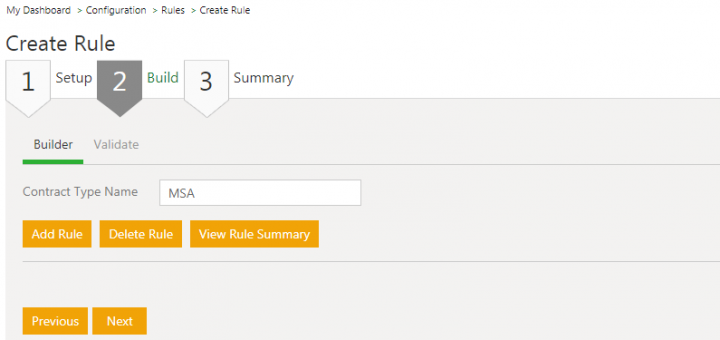
14. Click Next and add the Rule conditions.
15. Click Next.
16. Click View Rule Summary.
17. Click Create to create the Rule. The Rule created successfully message is displayed.
18. Click Ok. TheRule Index page opens.
The Rule has been created such that when a Clause Name Starts with AcmeRule, then the Clause will be included (or excluded based on the creation Rule) and the Clause Approver will be added to the Team at Step Number 10.
19. Go to the Agreement Management page and select the created Agreement (for example, MSA).
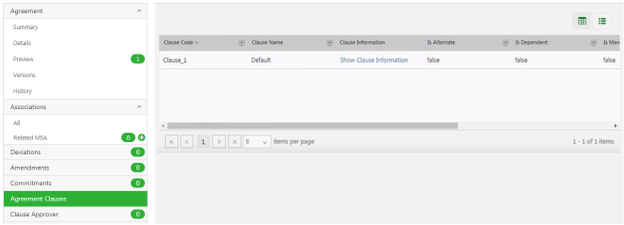
20. The Agreement Details page opens. Click the Agreement Clauses tab. The default Clause from the first version of the Agreement is displayed.
21. Edit the Agreement. If the Clause Assembly Rule is satisfied, then a new Clause is added to the Agreement. Click Next.
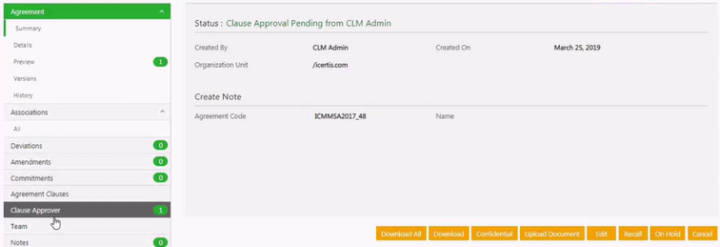
22. Click Update. A new Clause is added to the Agreement versions. The Clause Approval Rule is driven and the user is added (at Step Number 10 as defined). A new tab Clause Approver is displayed in the Pending state.
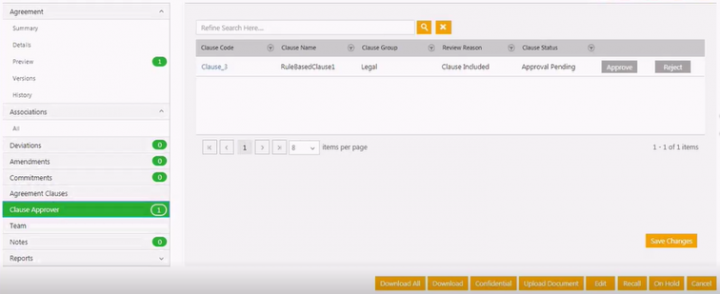
23. Click the Clause Approver tab. The Clause will be displayed with the Approve and Reject buttons.
You can also include or exclude Clauses using clause metadata or extended attributes (as discussed in the example above) or the Edit or Upload options. You can download the Agreement, and add, remove or modify a new Clause by setting up Rules in that way for Clause Approval.
Comparing Clauses
When an agreement is published, you can compare changes made to clauses between consecutive versions of the agreement. For the first version of the agreement, there are no clauses to compare, hence the Previous Text box displays no information and the Current Text box displays the information of the current version of the agreement.
To compare clauses between different versions of an agreement:
1. Click the Compare Clause Changes with Previous Document Version icon on the agreement Details page. The Compare Changes with Previous Document Version window opens. The Previous Text box does not display any clauses as it is the first version of the agreement. The Current Text box displays the clauses in the current version of the agreement.
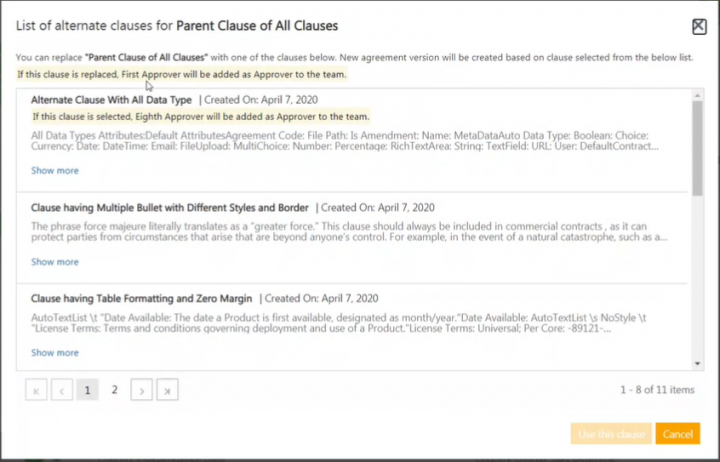
2. Click Select Alternate Clause. The List of alternate clauses for SOW Subclause 1 window displays a list of alternate clauses for SOW Subclause 1.
Replacing Clause Text from ICI
ICI allows replacing the clause text with the alternate clause text from ICI itself. This is accomplished using Compare Clause Changes with Previous Document Version icon available on the agreement Details page. For any particular Primary clause, users can view the list of alternate clauses by clicking the Select Alternate Clause link and select the Alternate clause to swap it with the chosen Primary clause. This Compare Changes with Previous Document Version window gives users the additional flexibility to preview the Previous Text and the Current Text of clauses.
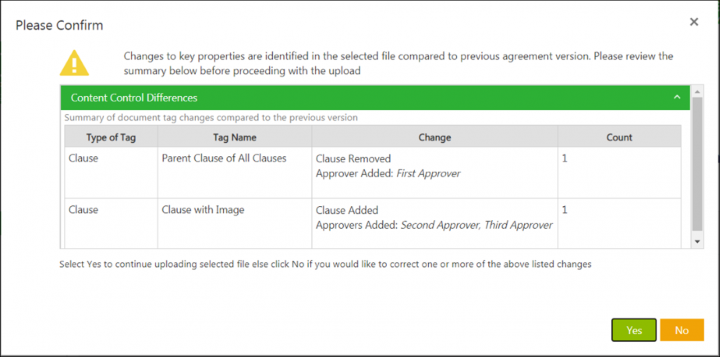
With this release, contract authors will now be able to preview the list of Clause approvers that are triggered when a clause is added, removed or replaced, and a new version of the agreement is created. The modifications can also be viewed on the Content Control Differences window, thus helping users to make informed decisions before actually creating a new version of agreement.
To replace clauses:
1. Click the Compare Clause Changes with Previous Document Version icon on the agreement Details page.
The Compare Changes with Previous Document Version window displays the clause difference between Current Text and Previous Text.
2. Click Select Alternate Clause. The List of alternate clauses for SOW Subclause 1 window displays a list of alternate clauses for SOW Subclause 1.
A message is displayed to indicate the Approvers which would be added if the clause is replaced. Separate messages are also displayed for those clauses, for which Approvers will be added if those particular clauses are selected. For example, If this clause is selected, Second Approver, Third Approver will be added as Approvers to the team. Here, contract authors can preview the set of approvers that would get added to the team, while replacing the clause with an alternate clause (before the document assembly takes place).
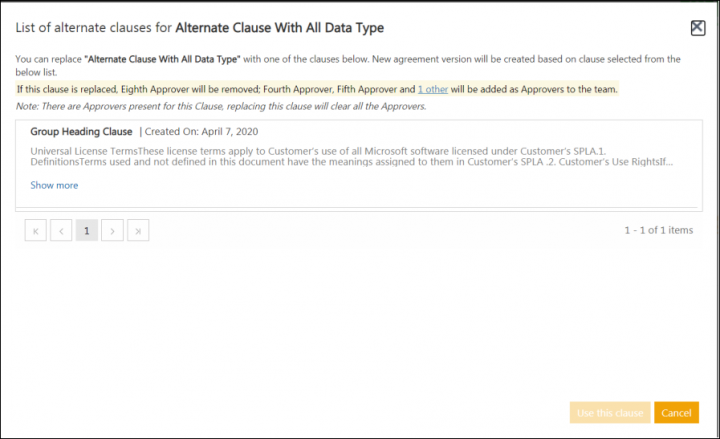
Similarly, a message is displayed for clauses where some Approvers will be removed, and others will be added. For example, If this clause is replaced, Eighth Approver will be removed; Fourth Approver, Fifth Approver and 1 other will be added as Approvers to the team.
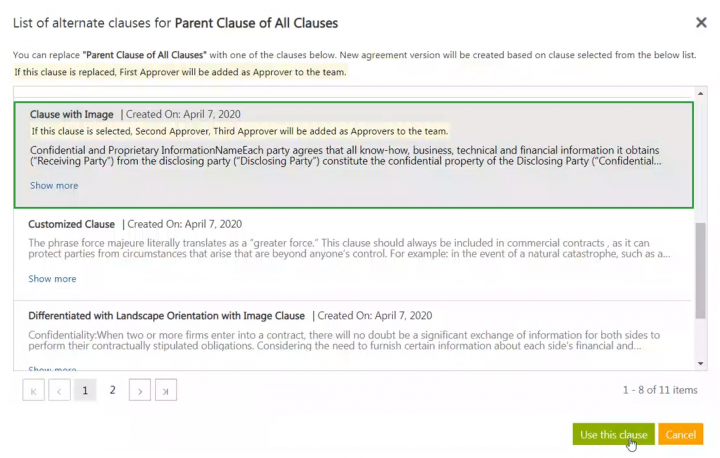
4. Click Use this clause.
5. ThePlease Confirm window opens if there is Dependent Clause available for the selected clause.
6. Click Yes if you want to add the dependent clause as well.
7. The SOW subclause 1 is replaced by SOW sub clause2 in the Compare Changes with Previous Document Version window.
8. Click Save Changes. The clause text is replaced by Alternate clause.
9. The Versions tab displays the changes made in the Clause text.
10. Click Show All Details to view the Content Control Differences. Details on any Approver(s) added due to swapping of clauses are displayed in the Change column.
11. The SOW subclause 1 is replaced by SOW sub clause2 and its dependent clause (SOW dependent clause).
Support for extended clause metadata
Previously, ICI had limited capability to capture additional attributes as part of a clause creation.
With this release, an entity to extend attributes is introduced to add more attributes to clauses which will be useful in capturing more granular level details related to the clause.
Users can now:
- Create masterdata contract types with additional clause attributes.
- View extended clauses attributes in the clause creation wizard.
- Configure clause assembly rules using extended clause attributes.
- Enter the values for extended clause attributes using Add-ins.
Creating the masterdata for additional clause attributes
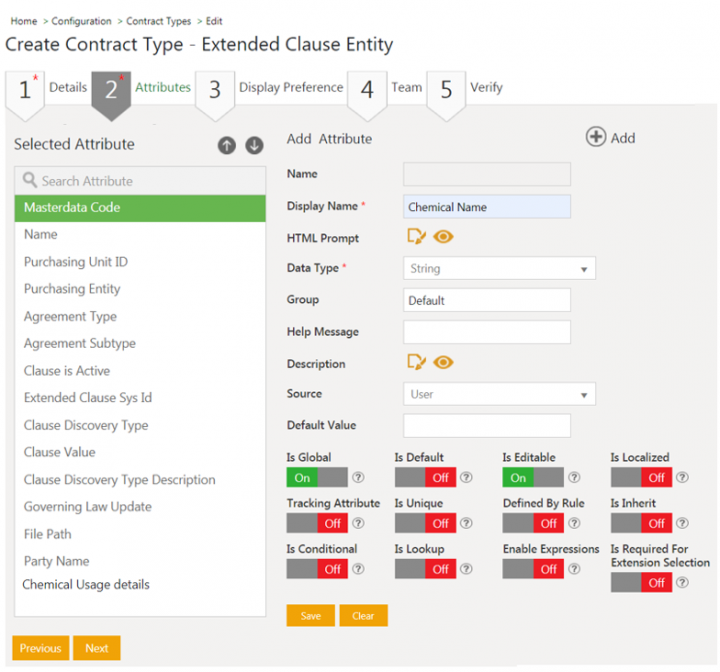
Users can create a masterdata contract type and define additional attributes to capture more details for a clause. These attributes will then be available as extended attributes while creating a clause.
To create masterdata contract type:
- Click Configuration > Create Contract Type > Masterdata on the Home page.
- Click Next. The Create Contract Type page opens.
- Enter a name in Contract Type Name field. For example, Extended Clause Entity.
- Define additional attributes on the Attributes tab.
- Enter details on the Display Preference and Team tabs.
- Verify the details and click Create. The masterdata is created.
- Click Send for Approval to send the contract type for approval.
Creating Clause with Extended Attributes
The extended attributes for clause are available while creating a clause if configured in your instance.
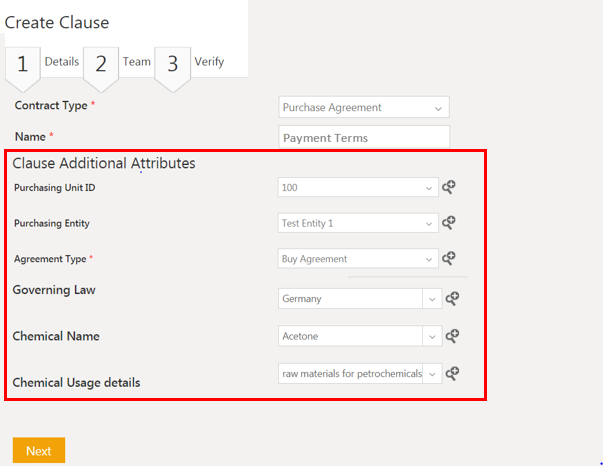
To create a clause with extended attributes:
- Click Clause Management > Create Clause on the Home page. The Create Clause page opens.
- Enter a clause Name. For example, Payment Terms.
- Enter the remaining details for clause metadata and clause additional attributes.
Attributes from masterdata Extended Clause Entity are available on the Clause Additional Attributes section on the Details tab.
- Click Next. The Team tab opens.
- Enter the details on the Team tab.
- Click Next. The Verify tab opens.
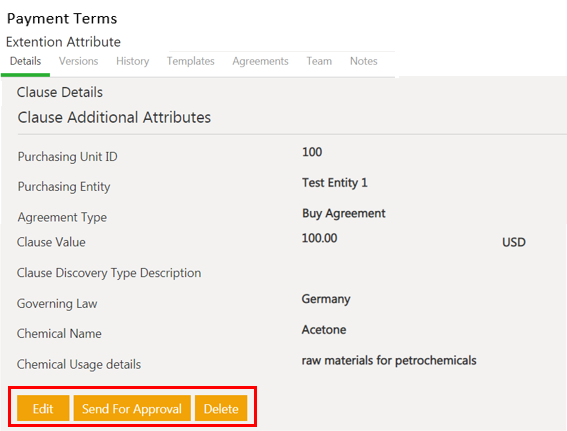
- Verify the details and click Create. The clause is created with extension attributes such as Chemical Name, Governing Law.
After clause is created, users can Edit, Send for Approval and Delete the clause.
Searching Clause with Extended Attributes
Users can search and retrieve existing clauses with extended attributes as search parameters from facet search on the Clause index page, Advanced Search, Global Search and Saved Search. Extended attributes are available in search facets drop-downs along with regular attributes with Extension Attribute: prefix.
To search clauses:
- Click Clause Management > Clauses on the Home page. The Clauses index page opens with all existing clauses.
- Type extended attribute in the Refine Search here… search box. The list of relevant clauses opens.
- Select extended attribute as search parameter in the Categories drop-down. For example, extended attribute Governing Law and values Germany, Austria in Categories. All matching clauses are displayed.
- Filter your search further by selecting and typing specific extended attribute value in the Custom Keyword field and click Apply. For example, Custom Keyword as Germany with operator Exactly. Only clauses containing Governing Law as Germany are displayed.
Users can search clauses by extended attributes using the Advanced Search and Saved Search.
On Advanced Search page, select Clauses in Entity drop-down and type extended attribute in the Refine Search here… search box. Refer to Using Advanced Search for details on using search filters, operators, and options.
Users can save the search criteria with extended attributes as search parameters and use as global or local Saved Search. Refer toSaved Searches for details on saving a search. Refer to Using Advanced Search for details on retrieving a Saved Search.
Configuring Clause Assembly Rule with Extended Attributes
You can configure clause assembly rule and include or exclude clauses with extended clause metadata in a same way as with clause’s regular metadata.
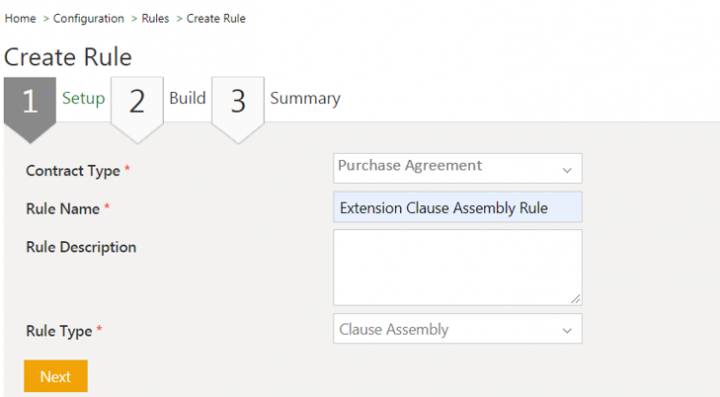
To create a clause assembly rule:
- Click Configuration > Rule > Create Rule on the Home page. The Create Rules page opens.
- Select the Contract Type for which you want to create a rule on the Setup tab. For example, Purchase Agreement.
- Enter a name in the Rule Name field. For example, Extension Clause Assembly Rule.
- SelectClause Assembly in the Rule Type.
- Click Next. The Build tab opens.
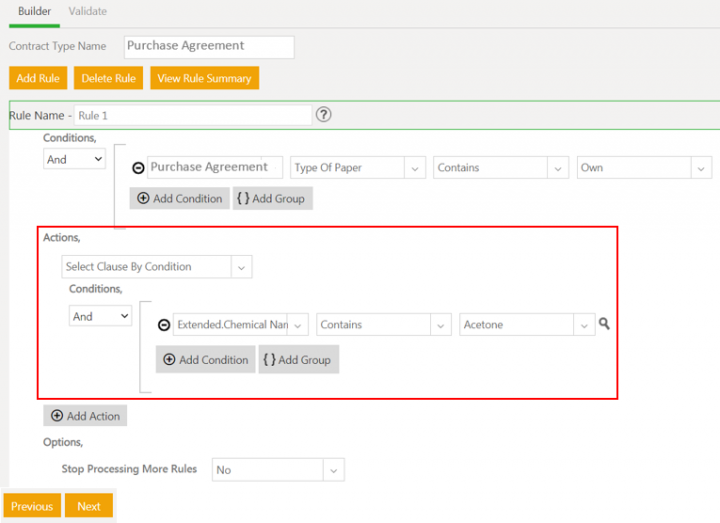
- Click Add Rule under Builder tab. The Add Rule section opens.
- Enter the Conditions. For example, for contract typePurchase Agreement, Type of Paper Contains Own.
- Select Clause by Condition in the drop-down on the Actions section.
- 'Selectthe extension attribute inConditions'drop-down. The extension attributes are available along with clauses metadata. For example,Extended.Chemical Name.
- Select the operator in Conditions next drop-down. For example, Contains.
- Select the extended attribute’s value in Conditions next drop-down. For example, Acetone.
- Select No in Stop Processing More Rules field. The further evaluation of rules within a ruleset continues.
- Click Validate. The page to validate the rule by entering attributes values of the selectedContract Type opens.
- Click Next. The rule Summary tab opens.
- Click Create. The Rule created successfully message appears. The rule is displayed in the list of Rules of the selected contract type.
Accessing Clause Extended Metadata from Agreements
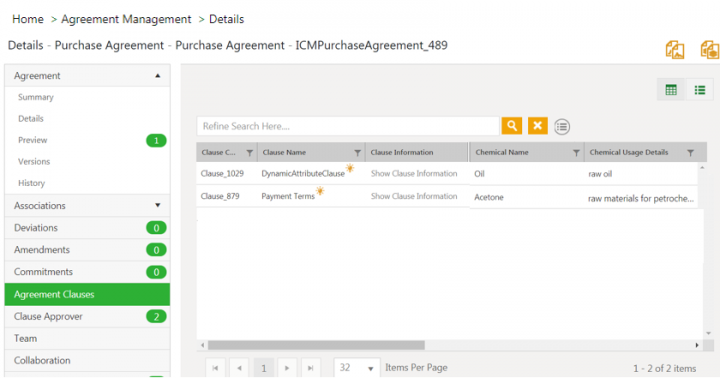
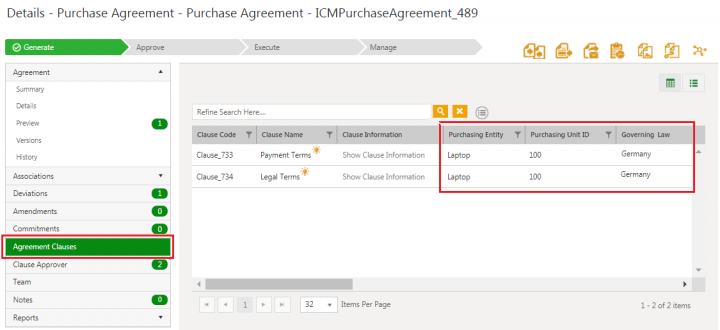
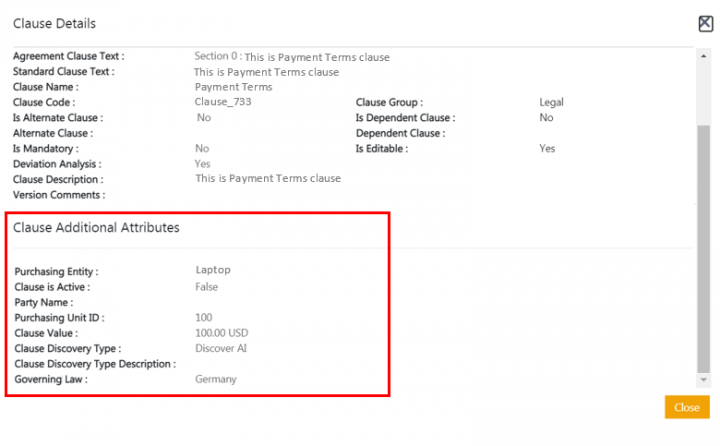
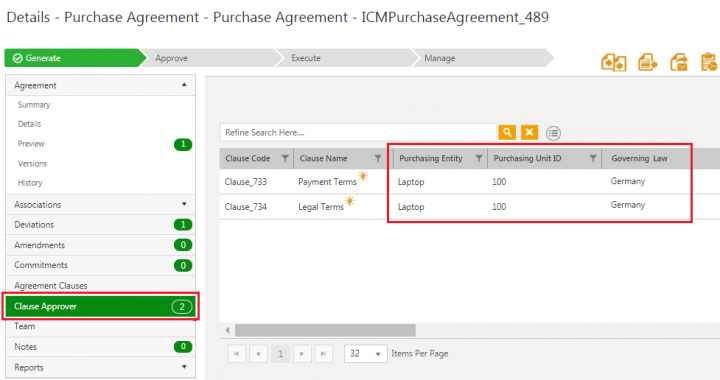
users can view these clause extension attributes on the agreement entity for easy reference while working with agreements by clicking Agreement Clauses or Clause Approver tabs in the left navigation pane on the agreement Details page.
Users can:
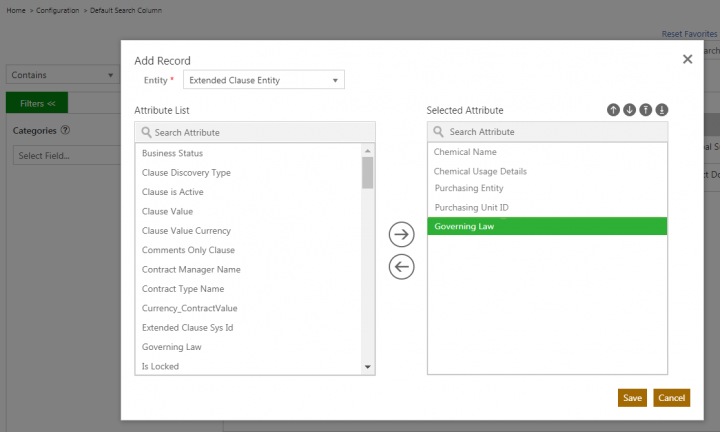
- Select and save extension attributes to display in the grid view, via the “Default Search” column functionality.
- View additional clause attributes on the “Agreement Clause” and “Clause Approver” tabs.
- View the hyperlink “Show Clause Information”, which displays all clause extension attributes along with clause attributes, in the same window.
To view clause extension attributes:
1. Click Agreement Management > Agreements on the Home page. The agreements Index page opens.
2. Click the View Record icon corresponding to the agreement you want to open. For example, Purchase Agreement. The agreement Details page opens.
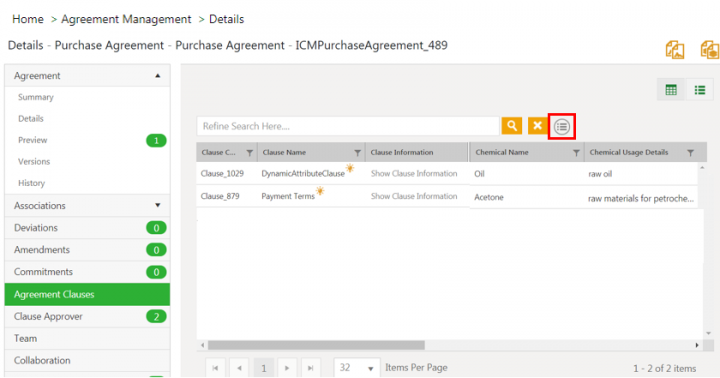
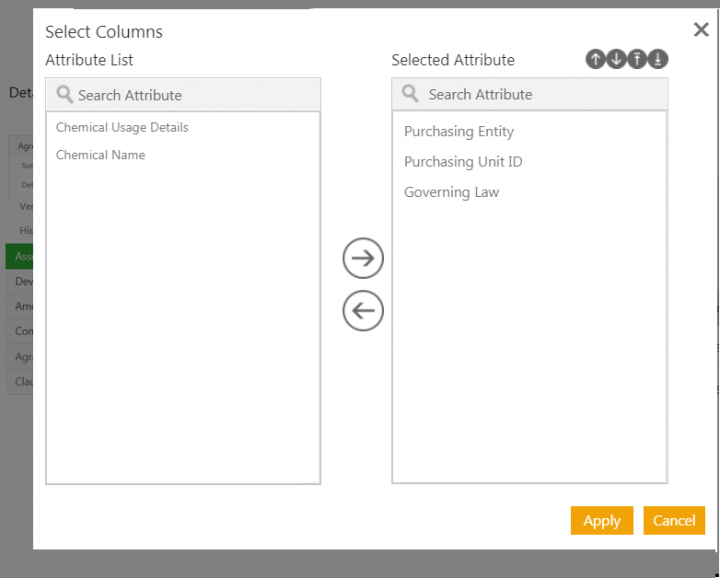
4. Click Select Columns action icon. The Select Attributes window opens displaying all the extension attributes defined in the Extended Clause Masterdata Entity.
Related Topics: Agreement Management | Agreements | Rule | Template Management | Release_Notes |
