ICI Obligation Management
In the evolving landscape for Enterprise Contract Management, proactive obligations management is playing a critical role. Tracking the obligations enshrined in contracts is critical to an enterprise’s understanding of whether the business is proceeding as planned and taking proactive steps to correct the course if not.
Non-compliance on obligations not only hurts performance, but also can expose businesses to substantial risks – including reputational damage, financial loss, and soured partner relationships
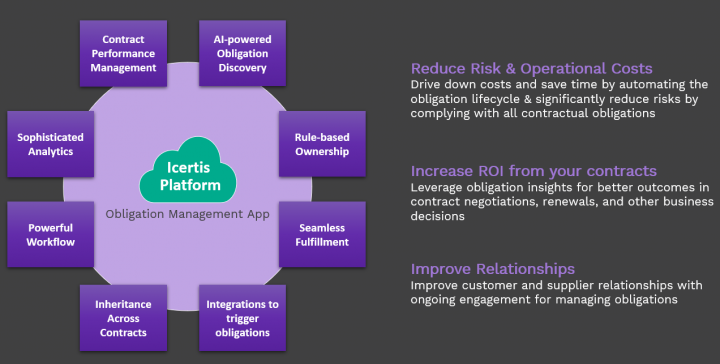
With this release, the ICI Obligation Management Application has been enhanced to enable companies achieve contractual compliance at an enterprise scale. Built on the ICI platform, the ICI Obligation Management app transforms how organizations identify, create, manage and fulfill obligations that were previously hidden in complex contract language. The app includes OOTB constructs for “Obligations” & “Fulfillments” assisted by powerful rule-based obligation ownership, workflow tools to ensure seamless obligation fulfillment, and sophisticated analytics – all designed to protect your business and maximize the ROI of your relationships. You can configure existing or new ICI Agreements to be able to manage Obligations.
The benefits of the Obligation Management App include the ability to:
- Identify the contractual obligations from different ICI signed contracts
- Create fulfillments from the identified contractual obligation
- Review obligations and related fulfillments
- Inherit contractual obligations from one contract to another
- Assign appropriate users assigned to your obligation and fulfillments
- Drive obligation and its related fulfillments to completion and giving you workflow controls (hold, withdraw, and cancel)
- Monitor your obligations and its business impact
Purpose of the Document
The purpose of this document is to:
- Introduce the ICI Obligation Management App and how it fits into the enterprise contract management workflow.
- Describe the business context and solution framework for ICI Obligation Management App
- Describe how the obligation Management is built on the ICI platform and how to set up and configure for your implementation needs.
- Describe the Config, Workflow for managing the Obligation life cycle.
The Prerequisites
The user must have:
- Completed ICI Platform Training
- Obligation Management Application must be enabled on the customer environment
Overview
In ever-changing business scenarios, the relevance of Enterprise Contract Management (ECM) to handle global contracts has grown manifold. Contracts establish a working model for a business to reach a future desired state - It defines the rules of business interaction and how business outcomes will be achieved. However, until business parties live up to the plan, those outcomes are not ensured.
Therefore, tracking obligations enshrined in contracts is critical to an enterprise’s understanding of whether the business is proceeding as planned and taking proactive steps to correct the course.
Non-compliance of obligations not only hurts performance but can also expose businesses to substantial risks – including reputational damage, financial loss, and soured partner relationships.
The ICI Obligation Management application built and designed along with the line of Icertis Contract Intelligence (ICI) platform provides out-of-the-box Obligation and Fulfillment objects and their workflow. Like everything on ICI, the app is highly configurable and extendible to suit customer requirements.
The Challenge
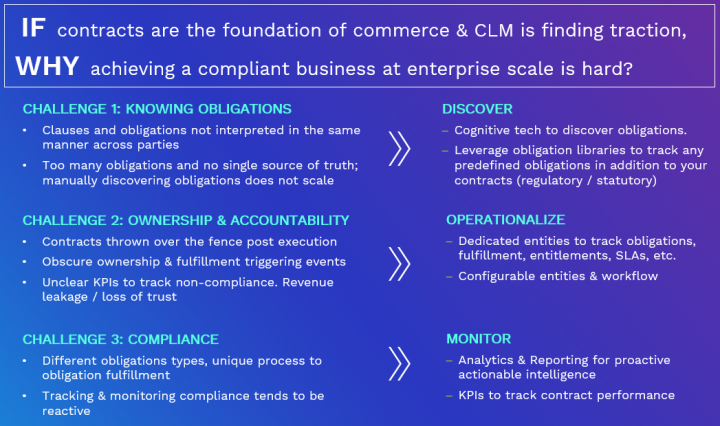
The holistic management of obligations in an enterprise is easier said than done. Manually managing obligations, as well as SLAs and entitlements, enshrined in contract clauses and terms has many challenges, from the sheer number of obligations found in contracts to the complexity of identifying and fulfilling them.
A major impediment to tracking obligation fulfillment is the enterprise-wide nature of obligations themselves. In the real world, one department may create a contract, but the onus to fulfill contractual obligations is usually on another department. This is a common scenario with manufacturers of complex products, like airplanes, automobiles, drugs, etc. The sales team at the airplane manufacturer accommodates an airline’s requirements in the contract to close the deal, but it is up to the sourcing department to buy the goods and services needed to meet those requirements, and maybe the customer services department to fulfill the warranty related commitments. Hence, the typical contract management process leaves obligations siloed within departments, hindering visibility, tracking, and ultimately performance.
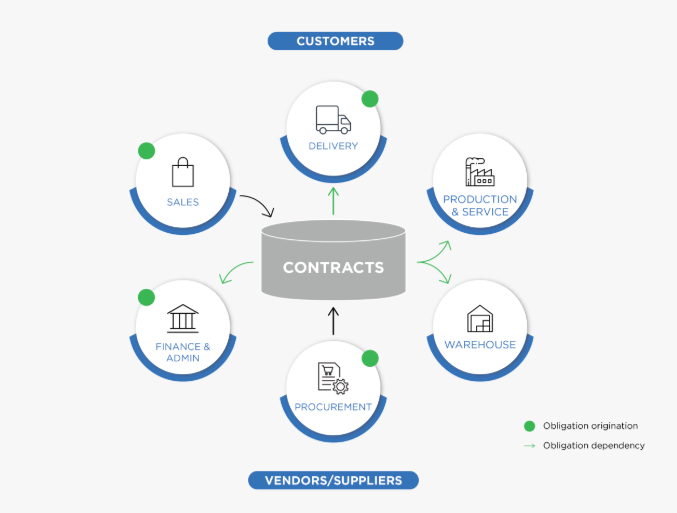 Conventional view of Enterprise Contract Management where obligations are viewed and managed in business silos
Even at organizations where contracts are centrally managed, obligation fulfillment may still be fragmented across the organization. It is estimated that at large organizations, 2% of revenue is lost due to missed obligations. Some key concerns for the CxO or senior leadership include: Are we fulfilling all our obligations? Are we defaulting on any business/regulatory or statutory obligations?
These questions are impossible to answer if obligations are not centrally managed and are not linked to various contracts that the organization has signed.
A McKinsey & Company study estimates leakage due to unfulfilled obligations at 2% in large enterprises. For an enterprise with $2 billion in annual spend, that adds up to $40 million a year. The identification and extraction of obligation is currently a human-vetted process, which is typically driven by the legal team and prone to human errors.
Some of the key challenges faced by companies dealing with contractual obligations are:
- A lack of insight and visibility into contractual obligations
- Failure to discover obligations
- Missing an obligation that can lead to a costly litigation
- Unfulfilling obligations that can strain business relationships and cause reputational damage
- No defined workflow for completion of obligations and commitments
- No clear ownership of responsibilities
- Failure to gauge the implications of missed obligations
A new approach is an obligation centered on contract management. This approach extracts obligations from the ultimate source of truth that contracts are and centralizes them to improve visibility and performance.
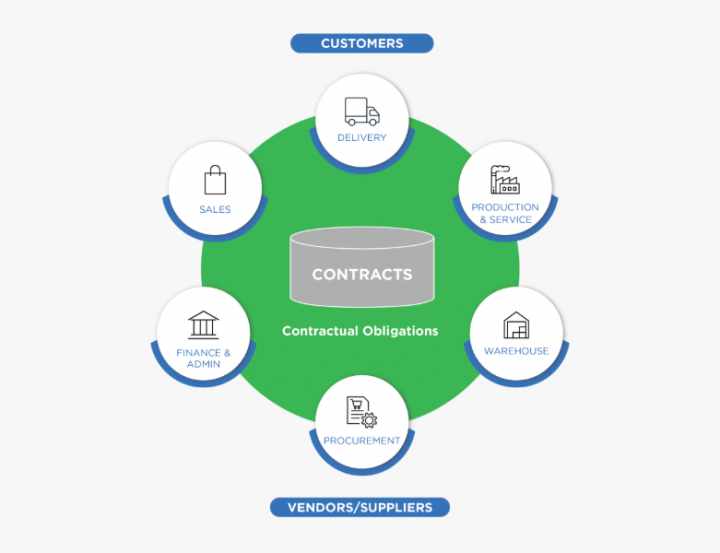 An obligation centered view to manage enterprise wide obligations
The Solution Framework
The ICI Obligation Management app, built on top of the ICI platform enables companies to execute this vision to drive compliance at enterprise scale, thereby building and protecting brand trust, improving business outcomes and most importantly ensuring that the business is always compliant.
The app provides an integrated environment that identifies and extracts existing obligations, risks, commitments from different ICI signed contracts to make them manageable, trackable, inheritable and contract-centric compliant.
The flexible architecture and configurable design of the platform allow users to configure and run a variety of obligations to their logical fulfillment. Given that the Obligation Management app is built on ICI Platform, implementations can easily configure dashboards and reports to have all-up views on overdue obligations.
The Capabilities
The ICI Obligation Management app helps customers address obligation requirements and get even more of their investment in the ICI platform. It offers these powerful capabilities for obligation management contracts:
- Automatic Obligation Discovery
- Automatically discover, extract, and setup obligations from any contract, through the power of artificial intelligence.
- Flexible Setup & Creation of Obligations
- Create manual or time-based fulfillments from identified obligations such that the system triggers fulfillments at appropriate times to enforce compliance.
- Automatically create obligations using the Obligation Library.
- Rule-based Obligation Ownership
- Assign obligations to both internal and external users and automatically handle reassignments due to transfers, departures, etc.
- Seamless Obligation Fulfillment
- Generate and manage fulfillment processes using ICI tasks for internal users and for third-party users via the ICI Collaboration Portal or customized integrations. The out of box workflows for Obligations & Fulfillments will help review, approval of workflows to drive compliance.
- Easily control the process workflow by setting obligations on hold, withdraw, and cancel if required.
- Inherited Obligations Across Contracts
- Quickly setup rules to cascade and enforce obligations across related agreements – e.g. from MSAs to SOWs.
- Sophisticated Reporting & Analytics
- Track and monitor overdue fulfillments.
- Measure risk and compliance to deliver rolled-up insights across the enterprise.
- Ability to slice and dice operational data on obligation compliance using Advanced Analytics (PowerBI).
The Examples
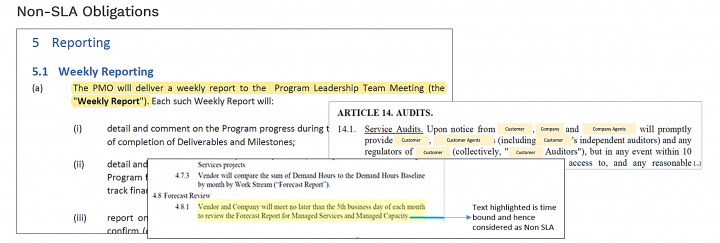
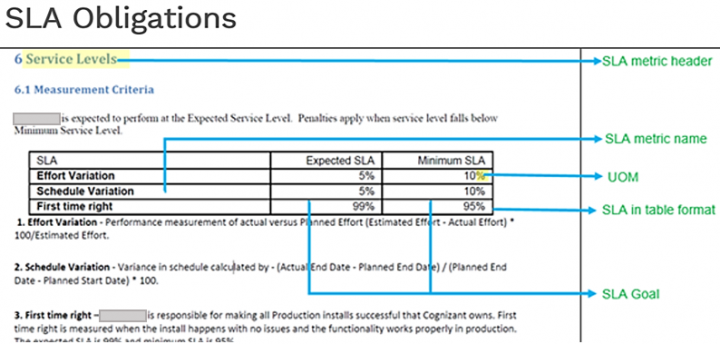
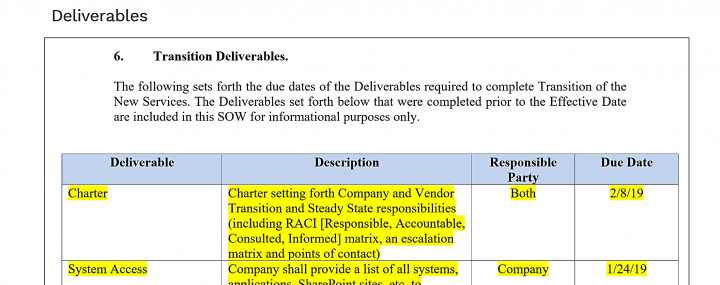
This section provides a sneak peek into some examples of contractual obligations and how they can be managed on the ICI Obligation Management app. These examples are intended to build a deeper intuition on what contractual obligations/fulfillments are, how obligations and fulfillments differ, and understand these from a lens of real-world contracts.
As you scan through the agreement/clause texts, one can recognize statements which enforce an action and ownership in the form of “X entity shall perform Y” kind of statements. These are typically referred to as the contractual obligations.
Note: The following examples are masked for customer/end-user references.
Example 1: Non-SLA Obligations
Example 2: SLA Obligations
Example 3: Deliverables
Example 4: Milestones
Example 5: Weekly SLA reports to track business/delivery performance.
Example 6: Background validation for resources working on the account.
For any typical Customer Offshore Development (ODC) scenario in a IT Services, the company has an obligation to ensure any resources working in this ODC/Customer Account shall go through background verification. This might be an obligation enshrined in the MSA or any of the ongoing SOW Agreements. The following are some of the scenarios:
This is an ongoing obligation until the duration of the customer’s contract. The Obligation owner may choose to fulfill the obligation in a time-based fashion say at monthly frequency
- This is an ongoing obligation until the duration of the customer’s contract. The Obligation Owner may choose to fulfill the obligation in a time-based fashion, (such as monthly frequency).
- The Obligation Owner OR Accountable Person(s) for this obligation is the SOW Owner (typically, Project/Delivery Manager).
- The Fulfillment associated to this agreement would be owned by another function (such as HR). But, the Obligation Owner will certify of the Fulfillment is met or not.
- The Fulfillment’s owners (HR in this example) will upload the Fulfillment Evidence in the form of a file or a zip which is approved by the Obligation Owner.
Example 7: Share Audit reports within XX days of notice.

The obligation in this example is on the Company to furnish the Audit reports to the Customer within a stipulated time (10 business days) when asked. This is not a time-based obligation, but will be manually accepted upon the event when the Customer asks for it. The Audit report can be submitted.
The Benefits
The key benefits of using the ICI Obligation Management app include:
- Significantly reduced risks by complying with all obligations - identify and execute any implicit or explicit promises, duties and accountabilities.
- Reduced costs and contract turnaround time by automating the obligation lifecycle.
- Improved customer and supplier relationships.
- Better outcomes in contract negotiations, renewals and other business decisions.
- Improved customer-supplier relationships with ongoing engagement for managing obligations.
- Advanced recovery of financial compensation for unfulfilled counterparty obligations.
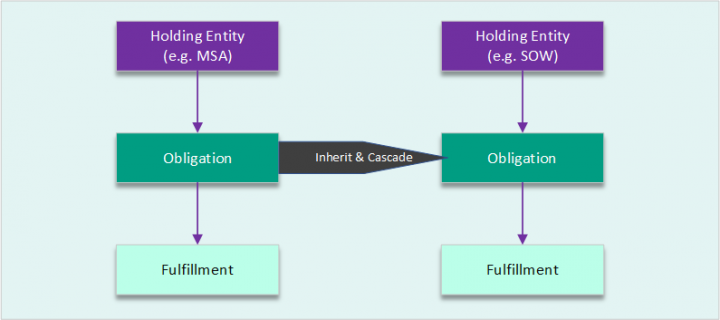
- Inherited obligation from the parent (MSA) to the child (SOW) to enforce compliance.
- Cascaded obligation changes from the parent (MSA) to the child (SOW) to enforce compliance.
- Intelligent management of contract performance with obligation performance tracking KPIs.
ObligationAI, Obligation Management and Commitments
We have some capabilities in the system which allude to the Obligation lifecycle. Here we describe the scope of each of them and clarify the scope entailed.
- Obligation AI (O/AI): As part of the Discover AI feature set, we have an ability to discover obligations from third party or own contracts. This capability helps assist the otherwise human process of manually discovering and extracting obligations from agreements. Once obligations are discovered, customers have the flexibility to integrate with the ICI Obligation Management app or any other third party integrated app.
- Obligation Management (OM): After obligations are discovered, either manually or through O/AI, we use the Obligation Management app capability to setup, track and monitor actual obligations. With dedicated entities called Obligation and Fulfillment, one can easily setup the ownership of obligation, setup the workflow to approve and agree with fulfillment evidence and track overdue fulfillments to have an all-up view of contractual compliance.
- Commitments: This capability is used to plan and perform agreement administration tasks. While some customers have tried using the Commitments capability to manage contractual obligations, there may be some limitations to managing the complete obligation lifecycle. Some of these include:
- Commitments are a light weight task and do not model the Obligation and Fulfillment entities or their workflow to manage the specialized Obligation lifecycle
- Commitments do not have an ability to create time-based fulfillments or capture fulfillment evidence which is core to the obligation management process
- Commitments have limited capability when it comes to configuring ownership, rules, notifications, etc. which are required by implementation teams
Note: It is recommended to use the Obligation Management app instead of Commitments considering these limitations.
The Obligation Management Process
The obligation management process augments your contract management process by giving you effective tools to discover, identify and manage obligations through to fulfillment. There are various scenarios in which Obligation Management fits into the Contract management process. Some examples of these are:
Example 1: Post Agreement Execution
The focus during this scenario is to ensure that the right set of obligations are discovered (either manually or with Obligation AI discovery) and thereafter managed through the complete lifecycle. In this scenario since the agreement is executed, the obligations are also agreed upon, hence the focus here is to ensure they are tracked through the Contract’s lifetime.
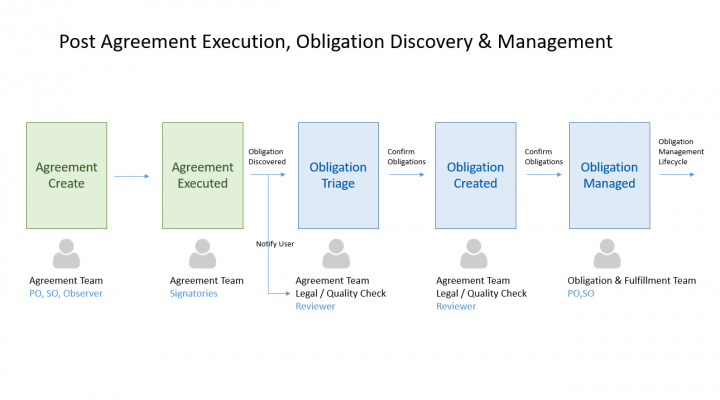 We can see the post-agreement execution phases for obligation discovery & management. We also call out the typical user roles that are involved in the process. Example 2: During Agreement Negotiation
 The focus during this phase is to use Obligations to assist the Agreement negotiation phase. When the Agreement edits, the Agreement Team would like to analyze the impact of change with respect to the obligations entailed.
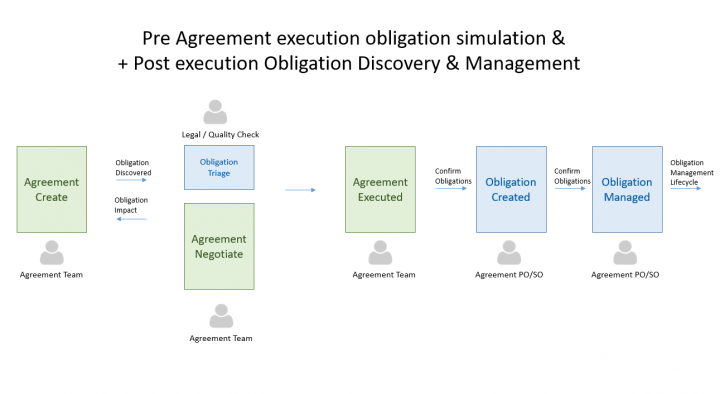 This depicts the Obligation discovery & triage along with the agreement negotiate phase
 Note: You need to configure ObligationAI such that Obligations are discovered upon every edit/new version of the agreement to be able to see the impact on obligations.
The Obligation Management Workflow
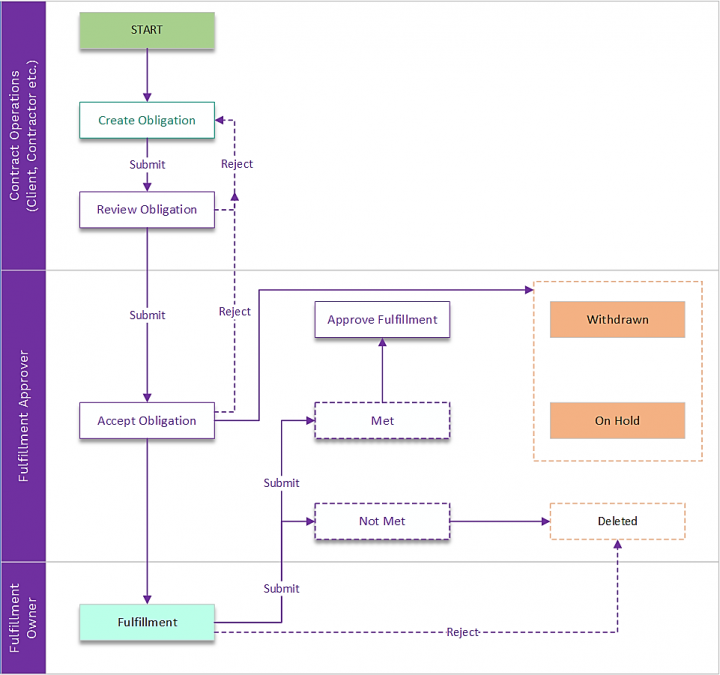
This section describes the typical workflow for Creating, Reviewing, Accepting and Tracking fulfillments. The diagram below depicts the typical functions/user roles performing the respective operations.
Key Points to Note:
The Legal / QC functions typically read through the agreements to manually extract Obligations or use Obligations AI to triage and discover obligations. This role has enough legal knowledge to identify the right obligations that matter for the agreement and the business as a whole. The obligations are created in the Draft state.
- Once identified the Agreement Owners, typically the Primary/Secondary Owner on the Team will accept and approve the Obligations. Only after Obligation is approved, the obligations lifecycle begins.
- For approved Obligations, Fulfillment instances are spawned at the configured frequencies. It is also highlighted that the Fulfillments owner is different than the Obligations Owner.
- Fulfillment’s team is responsible for submitting the fulfillment evidence and send it for approval to the Obligation owner.
- If the Fulfillment is not approved before the due date, the fulfillment turns to overdue.
Working with Obligations
The ICI Obligation Management app introduces necessary ICI entities to track and monitor obligations for your Agreements. The app introduces ICIOMAppObligation & ICIOMAppFulfillment entities. These are seeded with required config, workflows, rules, metadata which can be extended as required for your implementation needs. These entities are of type Associated Document Contract Types as referred to in the ICI terminology.
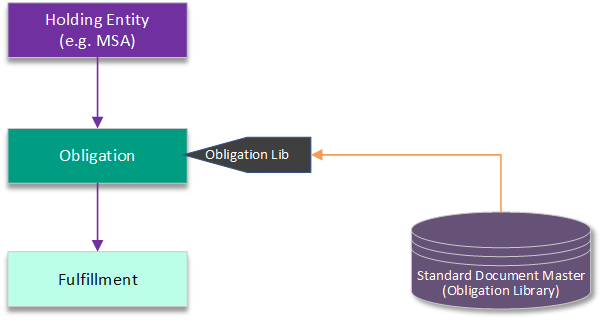
Obligation & Fulfillments are associated docs seeded with the required configuration. It is expected that you configure your existing/new Agreements by setting the association as depicted in the diagram below. In the sections below we highlight the configuration for the Out Of The Box (OOTB) Entities and also recommend a configuration for implementation.
The OM app is using the construct of the “Association of Association”. The obligation is an association to your Agreement. And Fulfillment is an association to the Obligation.
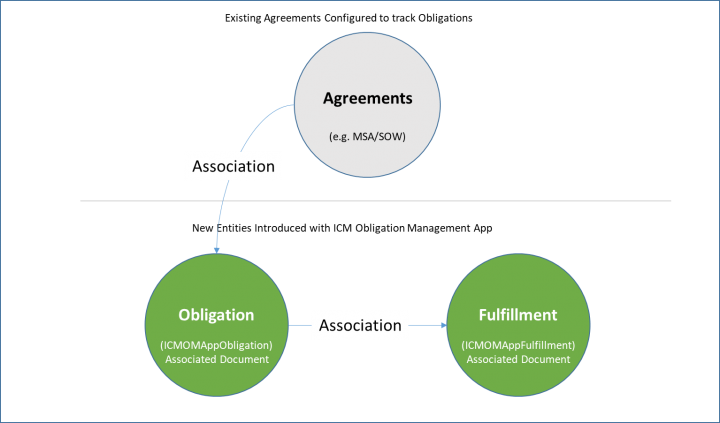 Depicts the new entities introduced for ICI Obligation Management App
Note: After you install the ICI Obligation Management App, you will be required to edit the configuration for the new entities (Obligation & Fulfillment) to suite your implementation requirements. In the following section we call out the recommended configuration (wherever applicable) to help you with Obligation Management implementation.
The Out-of-the-Box Entity
The “ICMOMAppObligation” entity is used to model Obligations. It uses the “Associated Documents Contract Type” and can be used to associate with the required agreements. The following sections will cover the out-of-the-box configuration, functional behavior as well as the recommended configuration for implementation teams.
Note: Only system provided Contract Type can be used for Obligation Management.
Contract Types
The Associated Document “ICMOMAppObligation” is seeded to track Obligations. It is expected that you will configure this seeded entity based on your implementation requirements.
Note: With the current release, multiple configurations of Obligation/Fulfillments are not allowed. So, you cannot create a new Associated Document Contract Type and identify it for Obligation tracking.
The following table depicts the OM App Contract Types:

Seeded Attributes
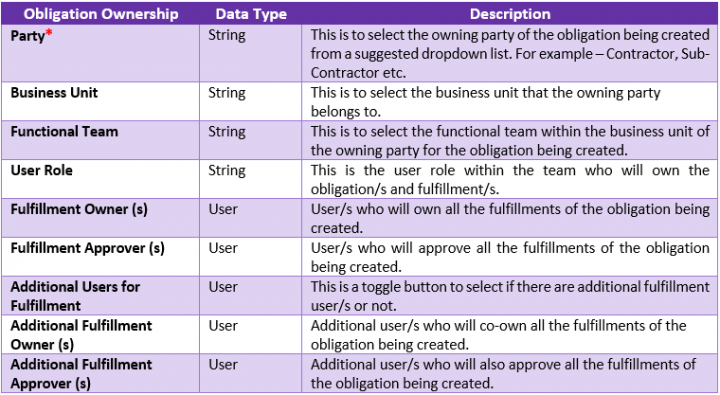
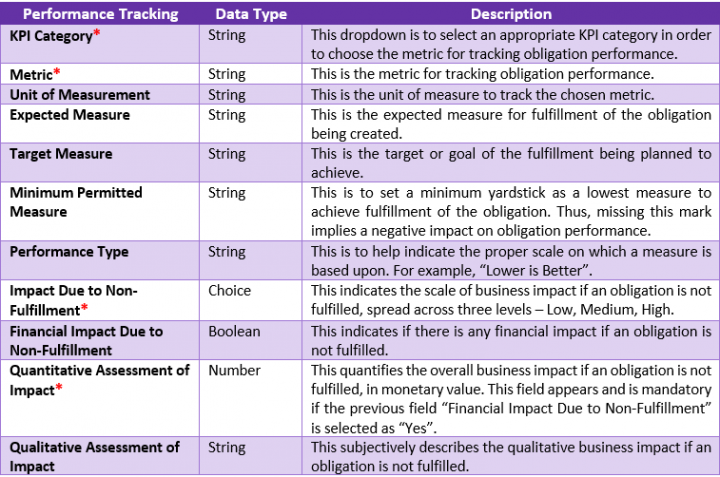
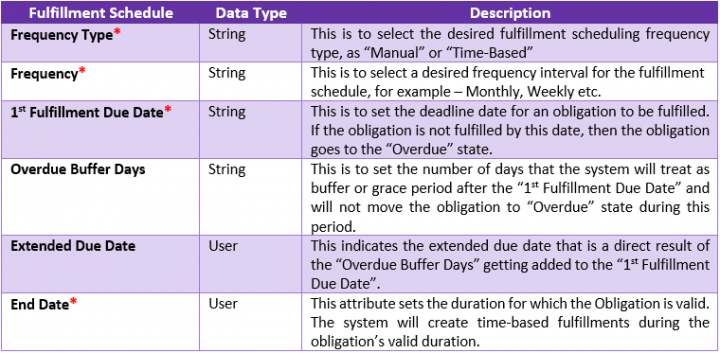
The seeded attributes of “ICMOMAppObligation” are listed as per the categories below. Implementation teams can add new attributes for identifying, categorizing and tracking obligations as required. Any attribute marked with a red asterisk * is MANDATORY for creating the Obligation instance.

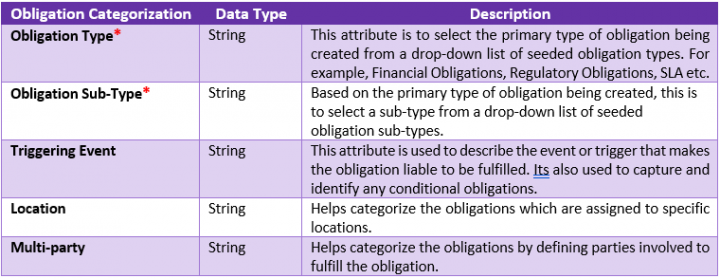


Association
The ICI Obligation Management app is modeled on the Association of Association construct.
The following Association hierarchy exists:
- Agreement (Existing)
- Associated to → Obligation Association
- Associated to → Fulfillment Association
It is expected for you to configure your existing Agreements to associate the Obligation Contract Type.
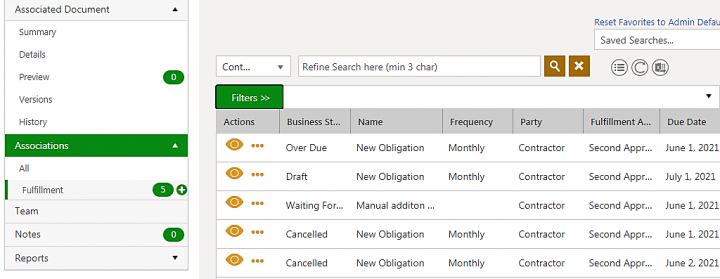
The following screenshot displays the Obligation’s association to Fulfillment which is seeded along with the app:
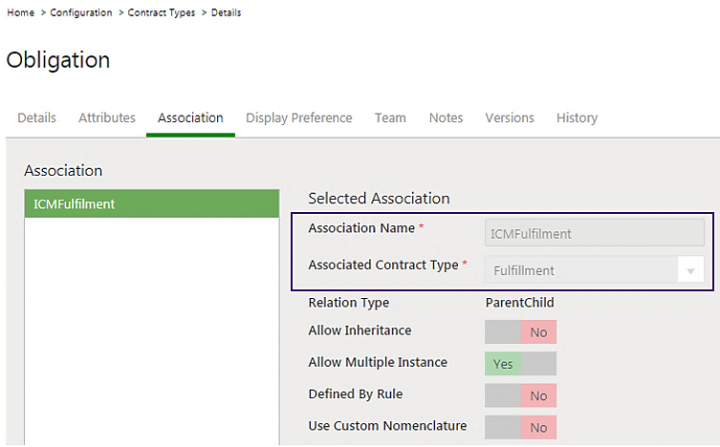
For more information about Association, refer to the “ICI Obligation Management Configuration Guide”.
Masterdata
These are the Masterdata Contract Types seeded with the ICM Obligation Management app, and they are listed in the following per grouping based on their collective purpose and in the hierarchy in which the masters are consumed within each group:
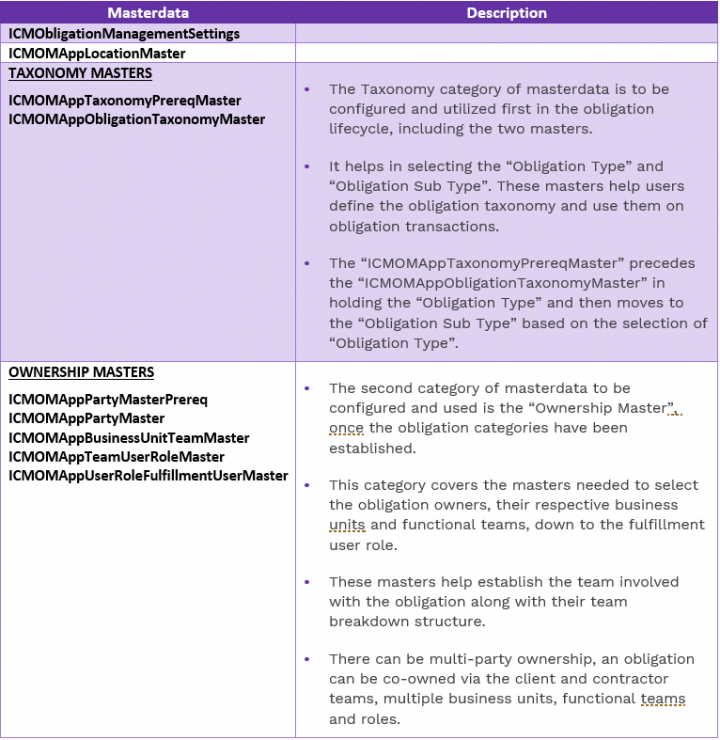

These will be used by the ICI Obligation Management app for supporting future scenarios related to Location or Multi-party.
Note: Implementation teams will use ICI’s bulk utility to add these new masterdata in bulk, not manually going row by row.
The following table shows the Masterdata in the sequence that they are needed to be entered for obligation creation flow to proceed per configuration:

Rules
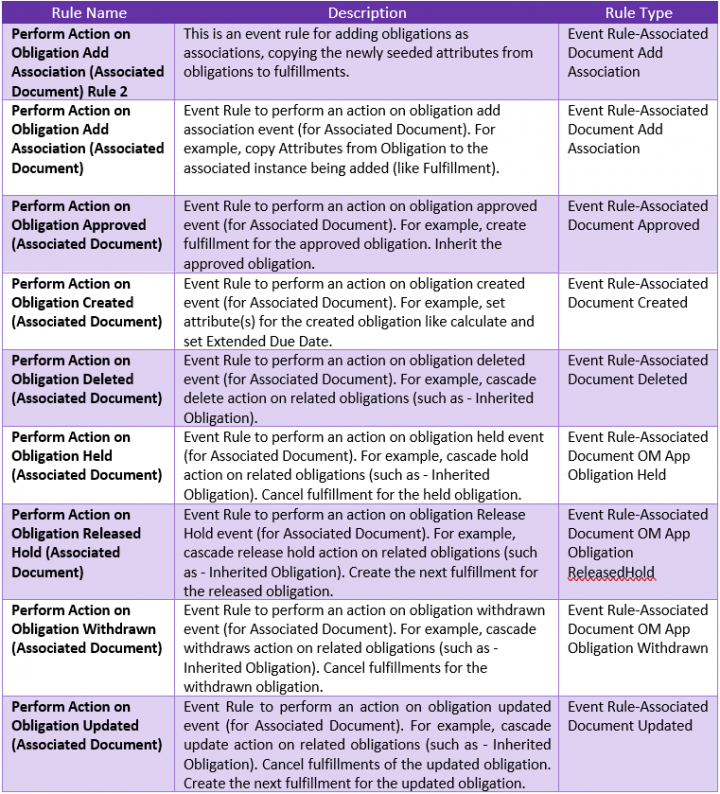
The ICI Obligation Management App has seeded the following set of rules. The contract type “ICMOMAppObligation” is configured with the following Rules:
Notifications
The ICI Obligation Management app has the following seeded notifications. Since the app is built on the ICI platform, implementation teams can configure notifications as required.
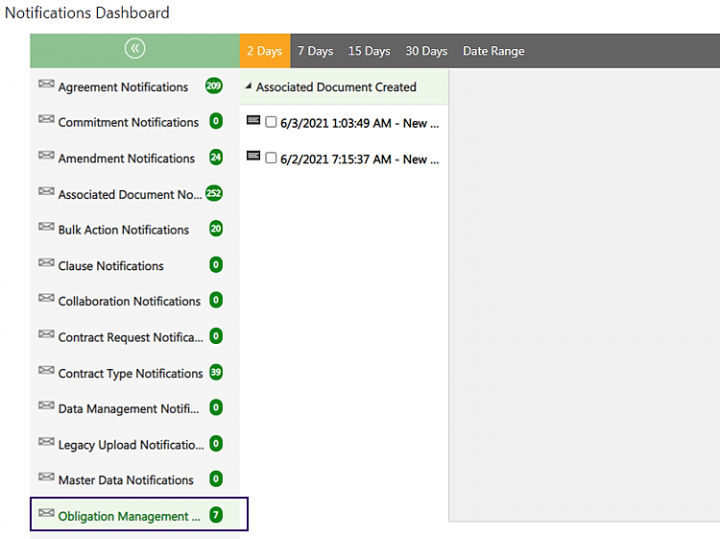
There is a dedicated Notification Category for the ICI OM App – “Obligation Management Notifications”, and a seeded notification for fulfillment creation has also been added:
- This is a seeded notification to notify fulfillment creations.
- The notification is triggered and sent when a fulfillment gets created.
- These notifications are sent to Fulfillment Owners.
|

Default Column Search Changes
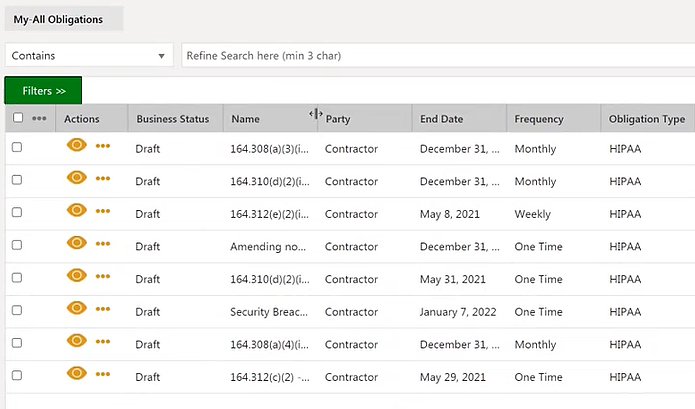
The seeded configuration for “Default Column Search” introduces new default columns to provide a better summary view of obligations on the index page. When a user searches for “Obligations”, the list of obligations displayed includes columns configured in the “Default Column Search” and, thereby, also provides a detailed insight into each obligation:
- Obligation Attributes
- Business Status
- Name
- Party
- End Date
- Frequency
- Obligation Type
- Obligation Sub-Type
- Fulfillment Owner(s)
- Impact due to Non-Fulfillment
- Metric
- Unit of Measurement
- Agreement Code
- Created By
Configuring your existing Agreement Contract Type to manage Obligations
You can use existing agreements or configure new agreements to manage obligations with the ICI Obligation Management app. Let us now consider an example for configuring the existing agreement contract type.
To edit the existing Agreement Contract Type to manage obligations:
1. Click the “Configuration" tile on the Dashboard, and select the “Contract Type” option. The Contract Types page opens.
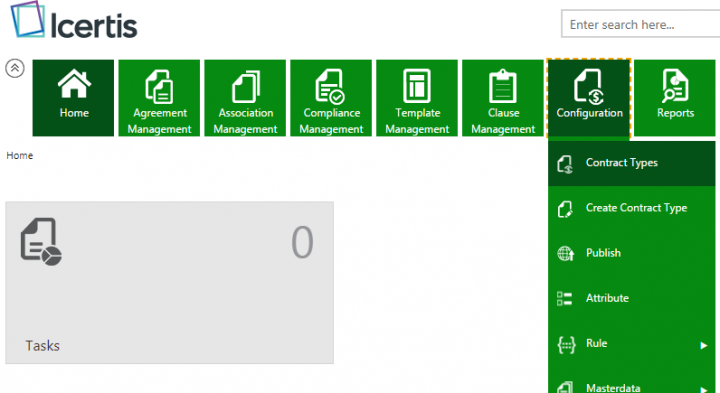 2. Select the Agreement Contract Type where you want to configure obligations. For example, MSA. 3. Click the "View Record" icon. The Contract Type Details page opens.
4. Click "Edit". The "Edit" page opens.
5. Click "Next".
6. Toggle "Yes" in the Allow Third Party Paper field.
7. Toggle "Yes" in the Allow Clause Assembly field.
8. Toggle "Yes" in the Allow Copy With Associations field.
9. Click "Next". The Attributes tab opens.
10. Select the attributes as per your requirement.
11. Click "Next". The Association tab opens.
12. Click the plus icon to add an association. The Add Association section opens.
13. To inherit obligation, you need to select Obligation as Associated Contract Type.
14. Enter a name in the Association Name field. For example, Obligation.
15. Select Obligation from the Associated Contract Type drop-down.
16. Toggle "Yes" in the Allow Inheritance field.
17. Toggle "Yes" in the Multiple Inheritance field.
18. Click "Save". 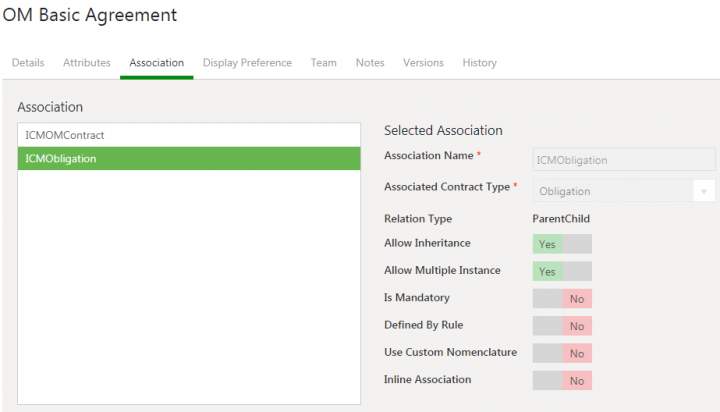 19. Click "Next". The Display Preference tab opens. 20. Enter the details in the remaining tabs such as Display Preference, Team and Verify. 21. Click "Update". The contract type MSA is updated with Obligation as Associated Contract Type. 22. Click "Publish" to publish the Agreement Contract Type.
Creating an Obligation for an Agreement
To create an agreement with an obligation:
1. Click the Agreement Management tile on the Dashboard, and click the “Create Agreement” option. The “Create Agreement” page opens.
2. Select the Contract Type Name. For example, OM Basic Agreement.
3. Select "Own" in the Type Of Paper drop-down.
4. Click "Next". The Attributes page opens.
5. Enter the details in the remaining tabs till the Verify page.
6. Click "Create and Publish".
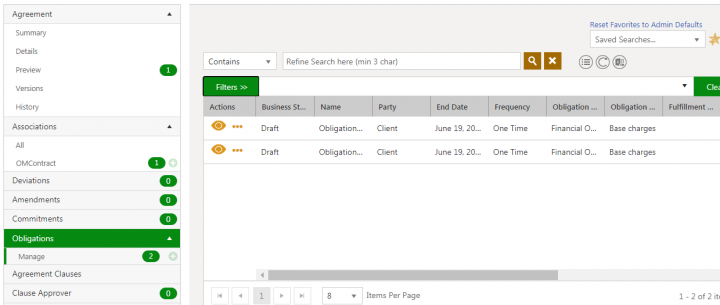
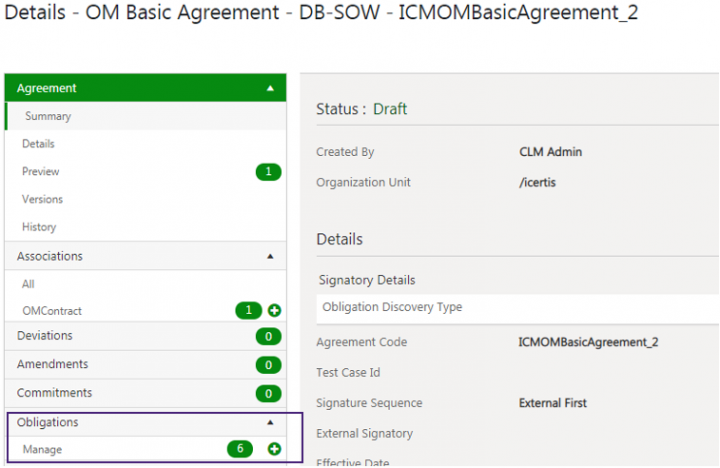
The Obligation created is displayed as shown in the screenshot below:
An obligation can have multiple fulfillments. Users can create the following types of obligations:
- Scenario 1: Time-based Obligation and Time-Based Fulfillment
- Scenario 2: Time-based Obligation and Manual Fulfillment
- Scenario 3: Manual Obligation and Manual Fulfillment
Creating an Obligation with Time-Based Fulfillment
To create a Time-Based Fulfillment:
1. Click the “Add” icon to create an obligation. The Create Association page opens.
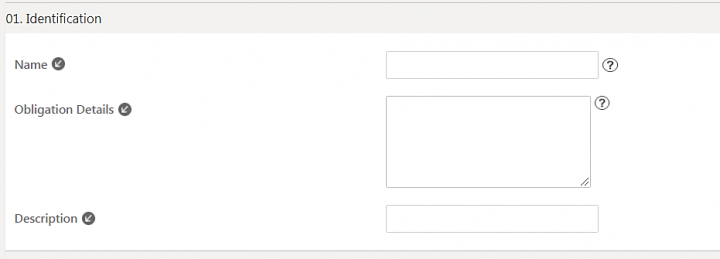
2. Enter the “Name” for the obligation.
3. Enter the “Obligation Details” and Description.
4. Select “Obligation Type” from the drop-down.
5. Select “Obligation Sub-Type” from the drop-down.
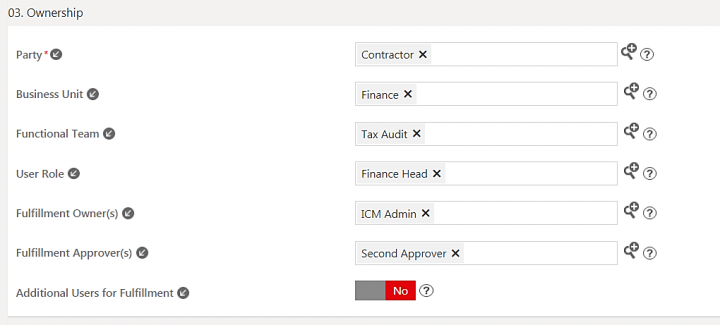
6. Select the owning party from the “Party” drop-down.
7. Select the Business Unit from the “Business Unit” drop-down. Based on the Busines Unit selected, the following fields get filled out as per seeded masterdata values per the seeded masters - Functional Team, User Role, Fulfillment Owner(s) and Fulfillment Approver(s).
8. Set the “Additional Users for Fulfillment” as “Yes” or “No”. If its “Yes”:
a. Fill out “Additional Fulfillment Owner”
b. Fill out “Additional Fulfillment Approver”
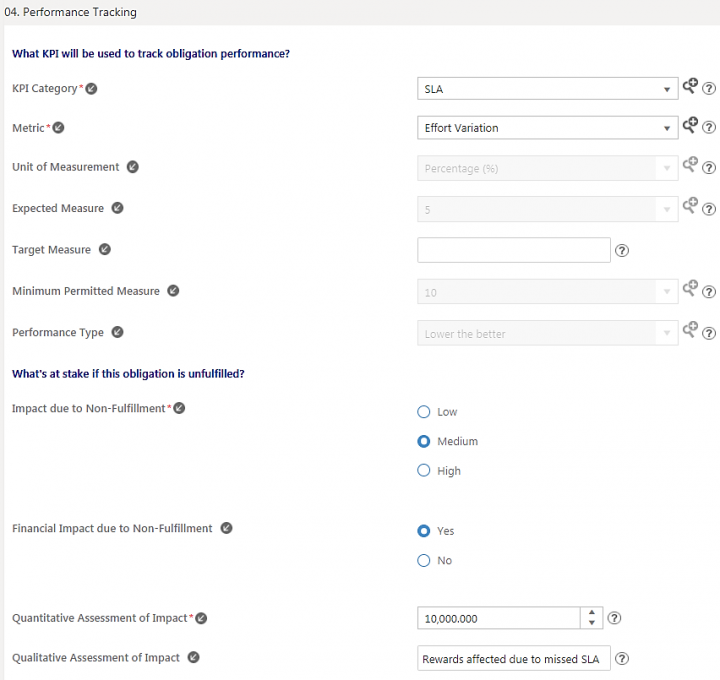
9. Select “KPI Category” from dropdown.
10. Select “Metric” from dropdown.
11. Fill other relevant KPI fields.
12. Select “Impact due to Non-Fulfillment” as “Low”, “Medium” or “High”.
13. Select “Financial Impact due to Non-Fulfillment” as “Yes” or “No”. If “Yes” is selected:
a. Enter “Quantitative Assessment of Impact”.
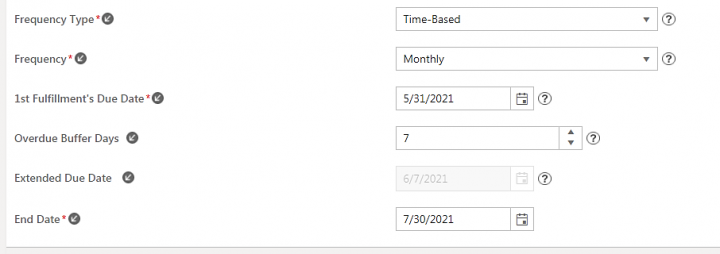
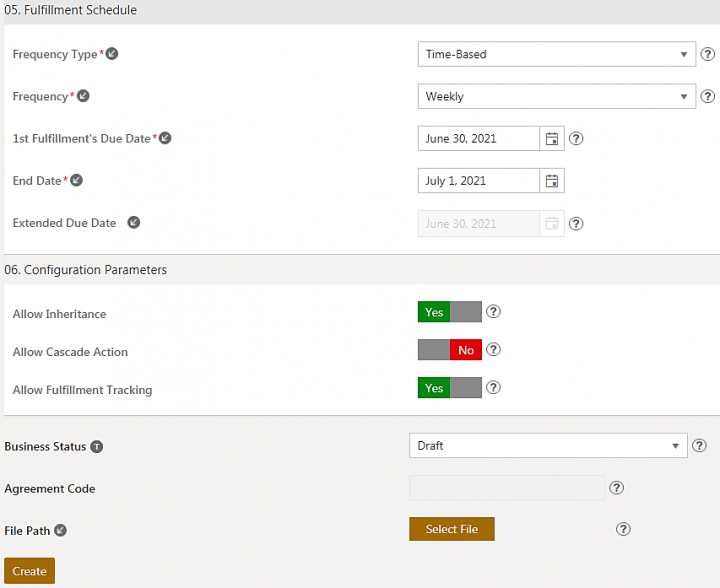
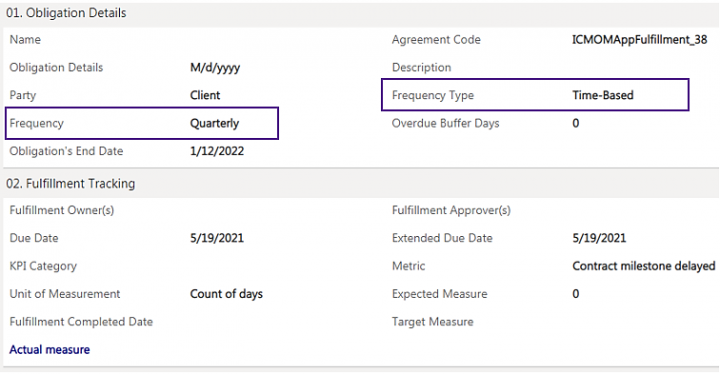
14. Select the “Frequency Type” from the drop-down. For example, “Time-Based”.
Note: Selecting the Time-Based Frequency Type will instantiate the fulfillments at the set frequency, and selecting the Manual Frequency Type will let users to manually add fulfillments.
15. Select the fulfillment frequency in the Frequency drop-down, for example, “Weekly”.
Note: You can set the following frequency: “One Time”, “Weekly”, “Fortnightly”, “Monthly”, “Once in 2 Months”, “Quarterly”, “Semi-Annual”, “Annual” and “Once in 2 Years”.
16. Select a date in the “1st Fulfillment’s Due Date” field.
17. Select a date in the “End date” field. This date indicates the end date for fulfillment.
Note: The Extended Due Date field is automatically extended by 2 based on the Due Date. The Extended Due Date is the summation of the 1st Fulfillment’s Due Date and the value of Overdue Buffer Days. The system will treat a fulfillment as overdue after the extended due date is over.
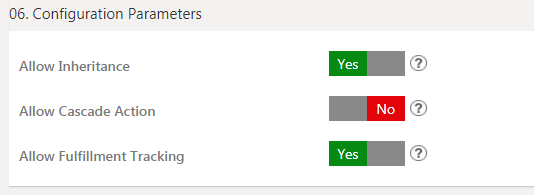
18. Set the “Allow Inheritance” field to “Yes”. This allows the inheritance of approved obligations from the parent agreement to the child agreement. For example, MSA_OM to SOW_OM.
19. Set the “Allow Fulfillment Tracking” field to “Yes”. This allows the system to track fulfillment instances.
20. Select a file in the “File Path” field.
The obligation is now created with a Weekly fulfillment.
Creating an Obligation with Manual Fulfillment
Follow the steps from 1 to 13 mentioned in the section Creating an Obligation with Time-Based Fulfillment and then do the following:
1. Select “Manual” in the “Frequency Type” drop-down.
2. Select a date in the “End date” field.
3. Set the “Allow Inheritance” field to “Yes”.
4. Set the “Allow Fulfillment Tracking” field to “Yes”.
5. Select a file in the “File Path” field.
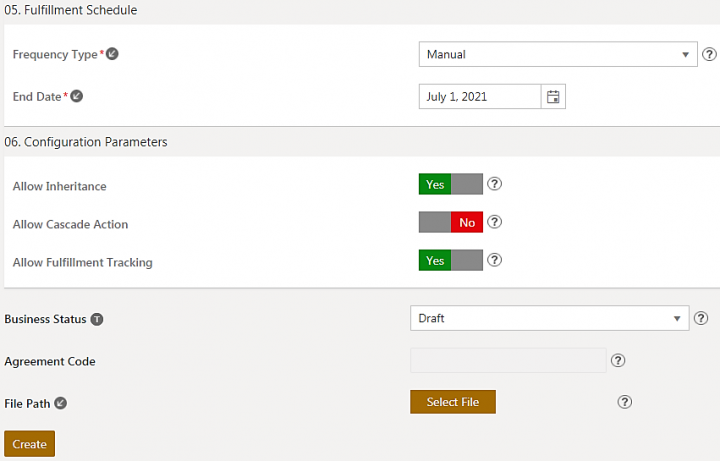 6. Click “Create”. The obligation is created with fulfillment.
Approving Obligations
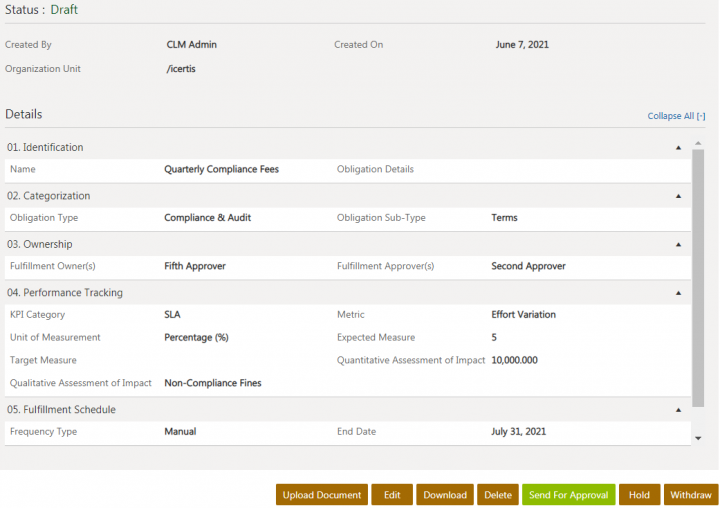
You can send the “Obligation” for approval as described in the following steps:
1. Click “Send For Approval” for the selected Obligation.
a. If the configured obligation is time-based, upon approval, the system generates the first instance of the Fulfillment.
b. The Obligation’s Team can be configured for the approver’s role. When the Obligation is sent for approval, it will create an approval task to the approvers on its Team.
2. Click “Yes” (or “No”) to confirm.
Note: Unless the obligation is approved, the user cannot create Fulfillment instances.
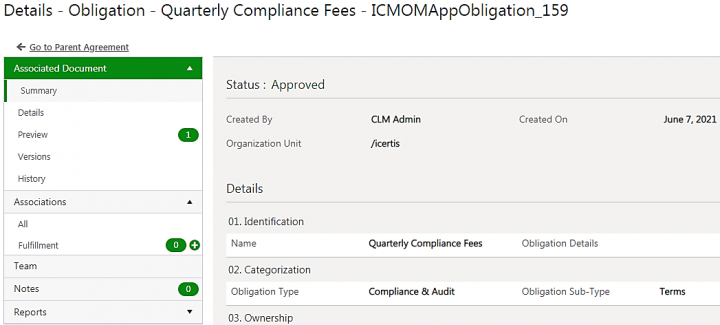
The obligation is now approved with the official status being displayed as “Approved”.
Putting Obligations On Hold
If for some business reason, for a given obligation, it is required to hold some fulfillment instances, you can set the Obligation on Hold. This will prevent creating new fulfillment instances during the period of hold. You can set the expiry date of the hold using the Hold Expiry Date attribute.
Note: When you put an Obligation on hold, any fulfillment that is not Approved will be marked Cancelled and will not be used to calculate overdue fulfillments.
To apply a hold on an obligation:
1. Click "Hold". The “Association Hold Note” popup window opens.
 2. Enter a Hold Note. 3. Select the appropriate Reason Code. 4. Select a Hold Expiry Date. The obligation gets released from hold on this day. 5. Click "Add". The obligation will thence go “On Hold”. Note: You can hold an Obligation based on the default Role Action Mapping. You can hold an Obligation at “Draft”, “Waiting For Approval” and “Approved” states.
Releasing the Hold
You can release the hold before the “Hold Expiry Date” by clicking the “Release Hold” button.
1. Click the “Release Hold” button. The Association Release Hold window opens.
2. Enter a hold note.
3. Select the appropriate “Reason Code”.
4. Click “Add”.
The Obligation goes back to the previous state before it went on hold.
Note: After releasing a hold, if the user approves the Obligation or the Obligation was already approved, the future applicable Fulfillment instances will be triggered at the configured frequency.
Applying Withdraw on Obligation
You can withdraw an obligation to send the obligation to Withdrawn state and all user actions are removed.
To withdraw an Obligation:
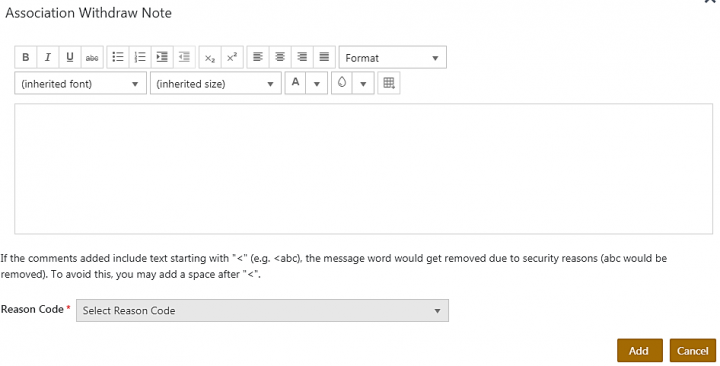
1. Click "Withdraw". The "Association Withdraw" window opens.
2. Enter a withdraw note.
3. Select the appropriate Reason Code.
4. Click "Add".
The obligation will be withdrawn.
After the obligation is withdrawn, all its fulfillments that were not approved will be cancelled.
Replacing User in Obligations
As a standard ICI platform capability, to replace user at the associated document level. User can be replaced in the following ways:
- One can replace user at the Obligation and Fulfillment record level.
- User can also be replaced in bulk, at system level, which is applicable to all Associated Documents, including Obligations and Fulfillments, replacing, say, “User 1” with “User 2”.
You can replace a user in Obligation from the Team tab.
1. Click "Team". The "Add Team" window opens.
2. Click "Replace User".
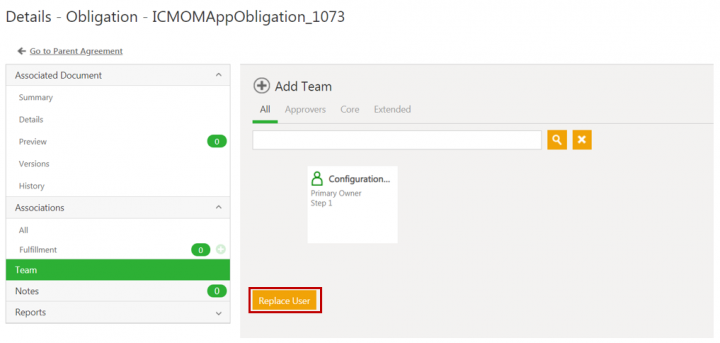 3. Select the User. 4. Enter Comments. 5. Select the Reason Code. 6. Click Add. The user is replaced.
Inheriting Obligations
Let us create a contract type (such as SOW) to understand inheritance in obligation (for example, from MSA_OM to SOW_OM).
Configuring your existing Agreement Contract Type to set Obligation Inheritance
Assuming that your instance has an SOW Agreement Contract Type, let us now edit its configuration to add association for tracking Obligations. After this, both our agreements MSA_OM & SOW_OM will start tracking Obligations.
Additionally, we will configure inheritance such that any Obligation that is approved in higher agreement type (e.g. MSA_OM) will be inherited to child agreement type (e.g. SOW_OM) in order to force compliance of contractual obligations.
1. Click the Configuration tile, click the “Contract Types” option.
2. Select the Agreement Contract Type for which you want to configure obligations. For example, “OM Basic Agreement”.
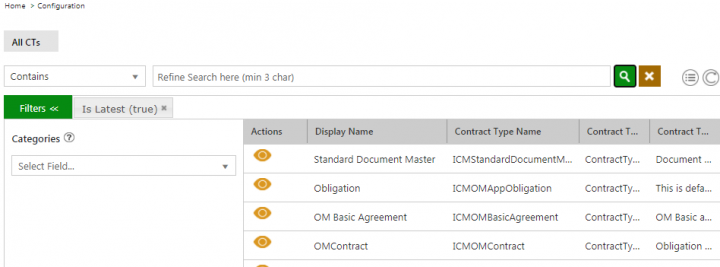 3. Click the View Record icon. The Contract Type Details page opens. 4. Click Edit. The Edit Contract Type page opens. 5. Click Next. 6. Toggle the Allow Third Party Paper field to Yes. 7. Toggle the Allow Clause Assembly field to Yes. 8. Toggle the Allow Copy With Associations field to Yes. 9. Click Next. The Attributes tab opens. 10. Select the attributes. 11. Click Next. The Association tab opens. 12. Click the plus icon to add an Association. The Add Association section opens. 13. To inherit obligation in SOW_OM, you need to select Obligation as Associated Contract Type. 14. Enter a name in the Association Name field. For example, Obligation. 15 Select Obligation from the Associated Contract Type drop-down. 16. Toggle the Allow Inheritance field to Yes. 17. Toggle the Multiple Inheritance field to Yes. 18. Click Save. 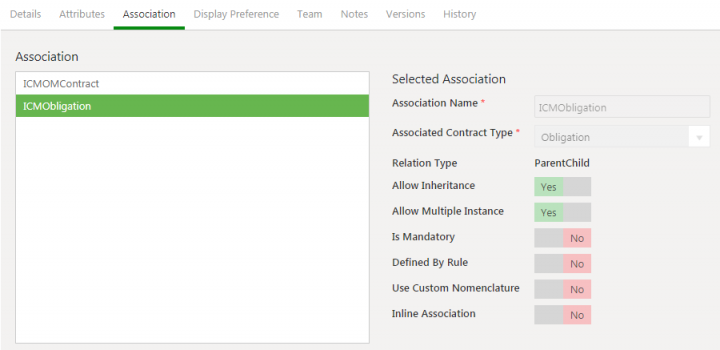 19. Enter the details in the remaining tabs such as Display Preference, Team, and Verify.
20. Click Update. The contract type SOW_OM is updated having an Associated Contract Type (Obligation).
Inheriting Obligations from Parent Agreement
Let us an example of inheriting obligations from the parent agreement (for example, MSA_OM obligations to SOW_OM).
1. Click the Agreement Management tile on the Dashboard. The Agreement Management page opens.
2. Click the Create Agreement tab. The Create Agreement page opens. 3. Select the Contract Type Name. For example, SOW_OM.
4. Select Third Party in the Type Of Paper drop-down field.
5. Click Next. The Attributes tab opens. 6. Click the down arrow icon in the Associate and Inherit field to inherit MSA_OM based agreement obligations to SOW_OM agreement. 7. The Lookup Search window opens.
Note: Ensure that the Allow inheritance flag is set to Yes to inherit obligations from the parent agreement as shown in the below screenshot. 8. Select the MSA_OM agreement from which you want to inherit obligation. 9. Click Select. 10. Enter the details in the remaining tabs to take it to Verify step. 11. Click Create and Publish. 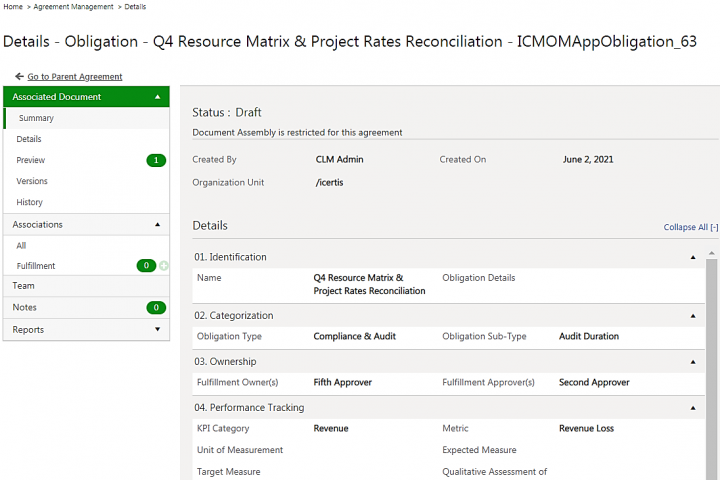 All approved obligations of the MSA_OM agreement (Parent agreement) have been inherited by the SOW_OM agreement (Child). Any changes made to the parent contracts obligations have been cascaded to the child agreement's obligations.
Note: The seeded attribute Allow Cascade Action is already set to Yes for the Contract Type (for example, MSA_OM).
Working with Fulfillments
The Out-of-the-Box Fulfillment Entity
The ICI Obligation Management app comes with a seeded Contract Type i.e. “ICMOMAppFulfillment”. As described earlier, Fulfillment is an association to the Obligation entity.
Contract Types
“ICMOMAppFulfillment” – This is an Associated Document Contract Type. It comes with a seeded set of attributes, workflow, rules and notifications. Implementation teams can easily tweak the configuration as per the customer’s requirements.
For more information about Fulfillment Contract Type, refer to the “ICI Obligation Management Configuration Guide”.
Seeded Attributes
The following attribute values are copied from Obligation to the associated Fulfillment, attributes marked with a red asterisk * are MANDATORY:
- Agreement Code
- Name
- Fulfillment for Obligation
- Obligation Details
- Description
- Obligation Type
- Obligation Sub Type
- Triggering Event
- Frequency Type*
- Frequency
- Due Date*
- Overdue Buffer Days
- Extended Due Date
- Obligation’s End Date*
- Expected Measure
- Metric
- Minimum Measure
- Unit Of Measurement
- Business Status
- Location
- Multi Party
The following attributes are used to capture Fulfillments completion, besides the aforementioned attributes used from obligation:
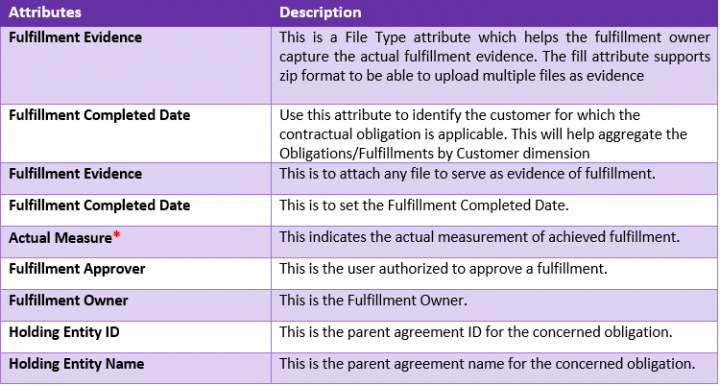
For more information about seeded attributes, refer to the “ICI Obligation Management Configuration Guide”.
Rules
The ICI Obligation Management app is seeded with the default set of rules. The contract type “ICMOMAppFulfillment” is configured with the following Rules:
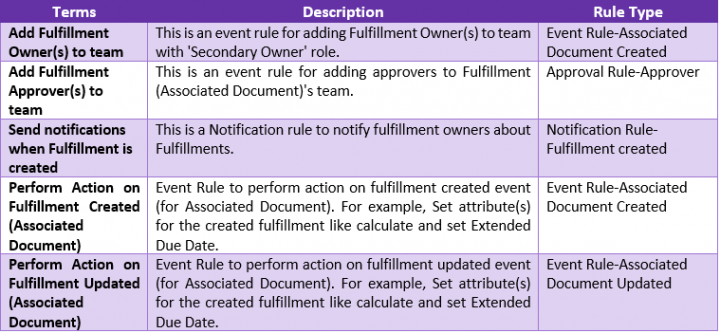
For more information about Rules, refer to the “ICI Obligation Management Configuration Guide”.
Default Column Search Changes
The seeded configuration for “Default Column Search” introduces new default columns to provide a better summary view of fulfillments on the index page. When a user searches for “Fulfillments”, the list of fulfillments displayed includes columns configured in the “Default Column Search” and, thereby, also provides a detailed insight into each fulfillment:
- Fulfillment Attributes
- Business Status
- Name
- Frequency
- Party
- Fulfillment Approver(s)
- Due Date
- Fulfillment Completed Date
- Metric
- Expected Measure
- Actual Measure
- Unit of Measurement
- Created Date
Creating and Editing Fulfillments
You can create Fulfillments manually for Obligations that have a frequency type set to “Time-Based” or “Manual”.
Note: An obligation can have multiple fulfillments. Users can create the following types of obligations:
* Time-based Obligation & Time-Based Fulfillment
* Time-based Obligation & Manual Fulfillment
* Manual Obligation & Manual Fulfillment
Adding Fulfillment Evidence
The Fulfillment team is responsible for submitting the fulfillment evidence and send it for approval to the Obligation owner.
1. Click the "Fulfillment" tab under the Associationstab.
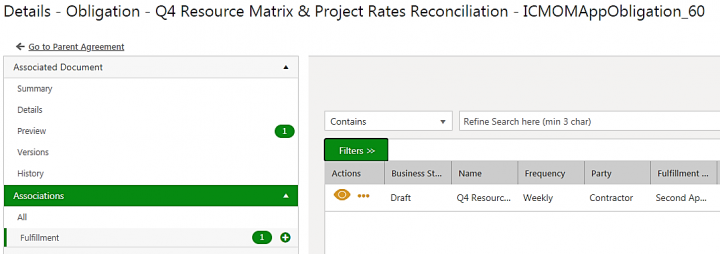 2. Click the “View Record” eye icon. The Fulfillment “Details” page opens. 3. Click on “Create Association” plus icon on the “Fulfillment” line item on the left pane. The “Create Association - Fulfillment” page opens. 4. Click on “Select File” against the “Fulfillment Evidence” field under the group “Fulfillment Tracking”. The standard file selection pop window appears.
5. Select the desired file as evidence for fulfillment and Click “Open”. The required file is now added.
6. On filling up the remaining “Create Association - Fulfillment” fields, click “Create”. A fulfillment “Draft” will be created with the attached “Fulfillment Evidence”.
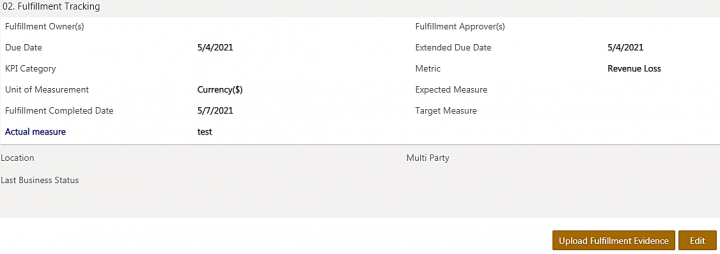
Alternatively, you can also upload the Fulfillment Evidence from the Fulfillment Details page.
Once you open the desired Fulfillment, with the Fulfillment Details page open:
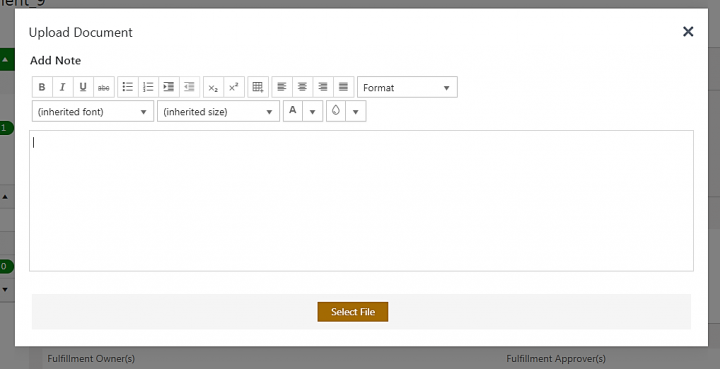
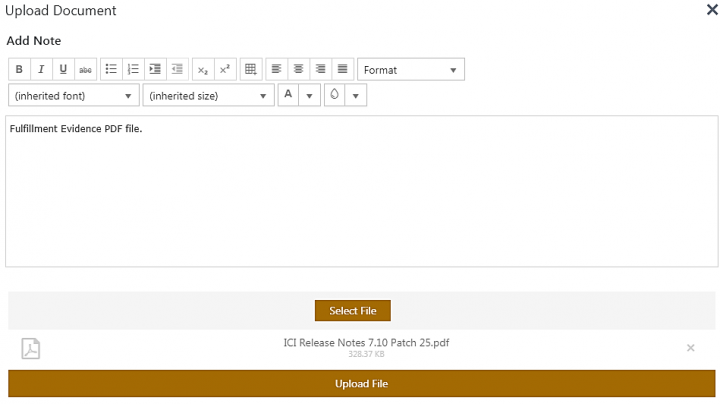
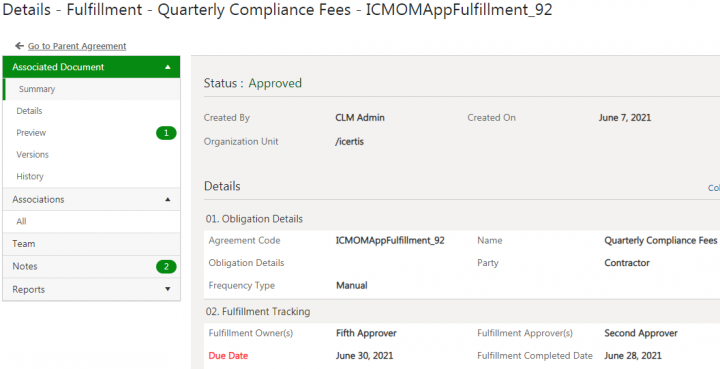
1. At the bottom right of the page, click “Upload Fulfillment Evidence”, the “Upload Document” popup opens.
2. Write an appropriate note in the “Add Note” text area, and click “Select File”. 3. Select the desired file as evidence for fulfillment and click “Open”. 4. Click “Upload File”. The required file is now added as fulfillment evidence.
Approving Fulfillments
The Fulfillments are approved by the Obligation owner by reviewing the submitted Fulfillment evidence. Let us look into an example:
1. Click the “Fulfillment” tab on the Obligation “Details” page.
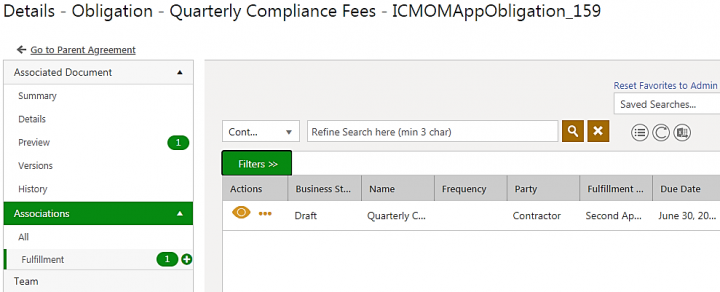 2. Click the View Record icon, the fulfillment “Details” page opens with “Draft” status. 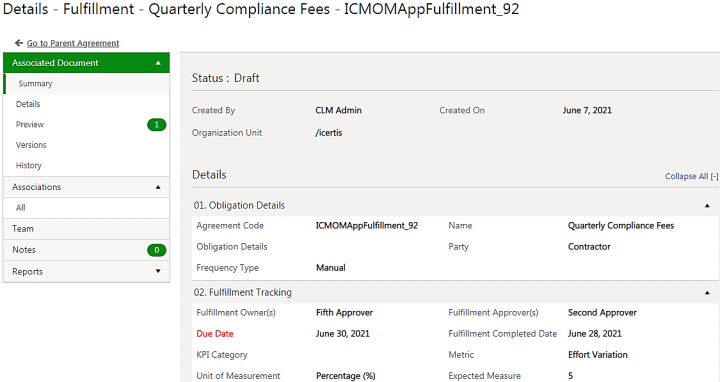 3. Click “Send For Approval”. The fulfillment is sent to the approver. 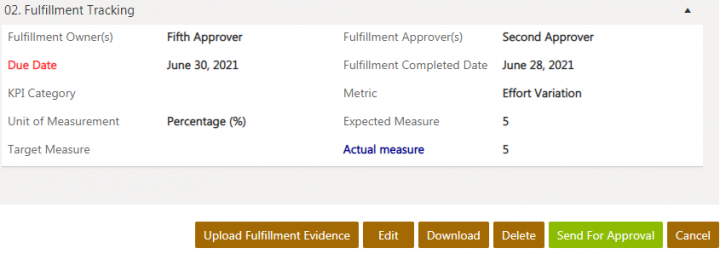 4. Upon approving, the fulfillment moves to the “Approved” state.
Cancelling Fulfillments
Fulfillments created can be cancelled at any stage, as desired. To cancel fulfillments:
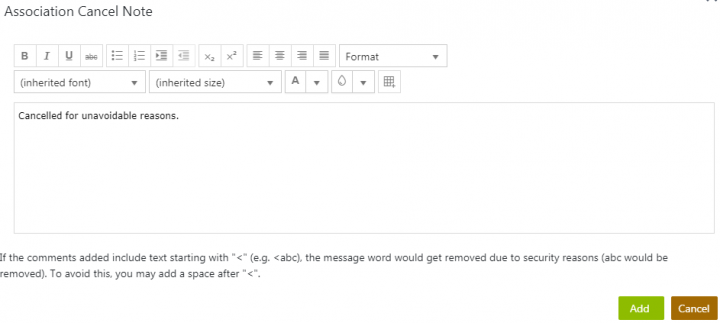
1. Click the “Cancel” button at the bottom right of the Fulfillment Details page. The “Association Cancel Note” popup window opens.
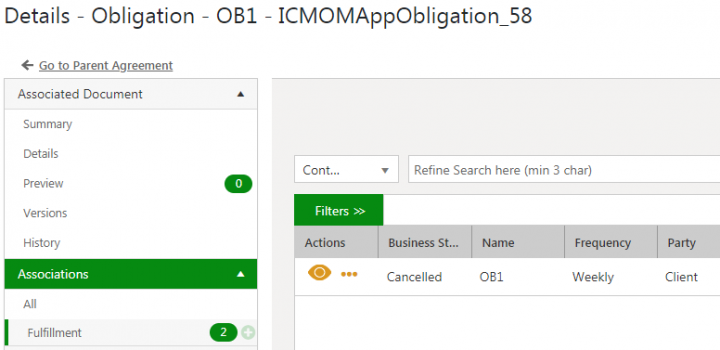
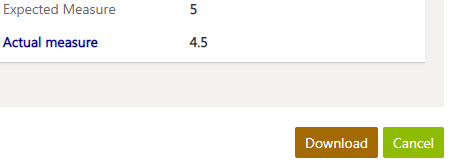 2. On the “Association Cancel Note” popup window, add any desired note, and click on “Add”. The fulfillment is thereby cancelled and displays the status “Cancelled” on its Details page.
Fulfillment KPI Tracking
When an obligation is approved, a corresponding fulfillment record is automatically created with “Draft” status.
To track the Fulfillment to its actuals:
1. Click and open the fulfillment record created. The Fulfillment will be in “Draft” state and the “Actual Measure” attribute will not have any value.
2. Click “Edit”, the “Edit Associated Document - Fulfillment” page opens. 3. Fill the Actual Measure, and Click “Update”. The Fulfillment Details page is now updated with the “Actual Measure” achieved. 4. Click “Send for Approval”. The Fulfillment will now be approved. If there are any or more fulfillment evidence required, then you can upload the same by following steps 2 – 5 from the previous section “VI. Adding Fulfillment Evidence”.
Configuring Reports
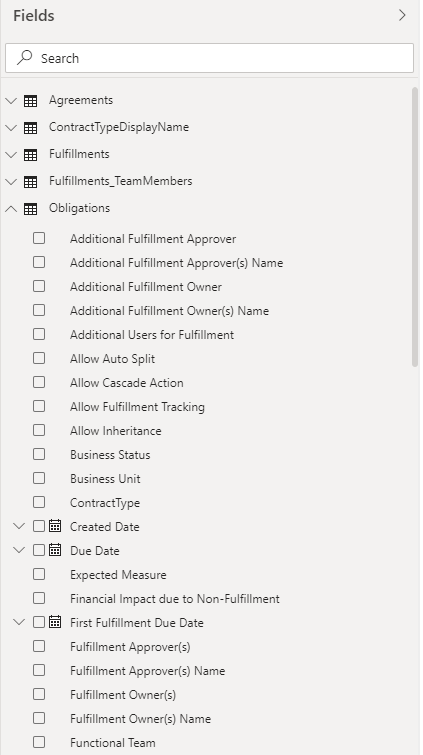
The ICI Obligations Management app does not come with inbuilt reports. However, since the ICI Obligation Management app is built on the ICI platform, one can use the ICI capabilities for Search and Saved Searches to get an all-up view of Obligations and their Fulfillments. Additionally, you can use Saved Searches to set as dashboard tiles.
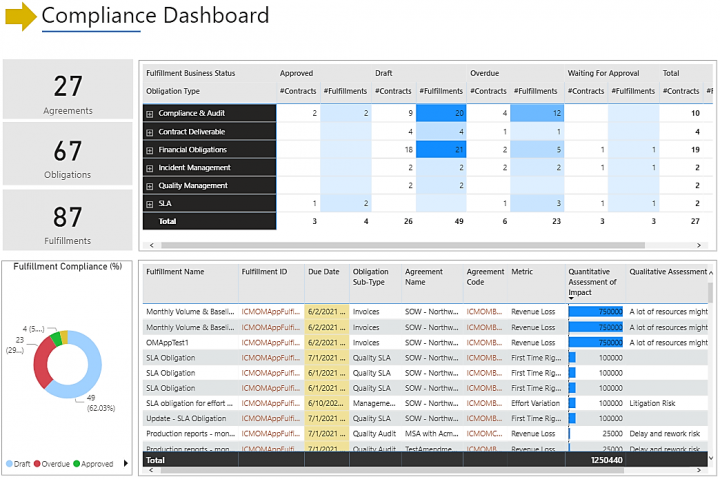
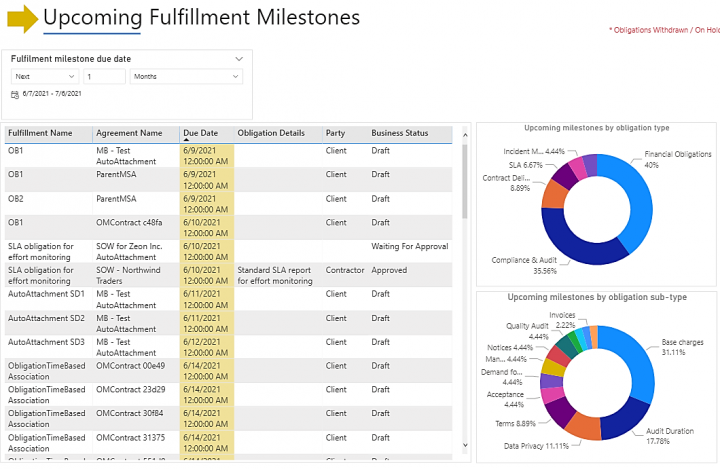
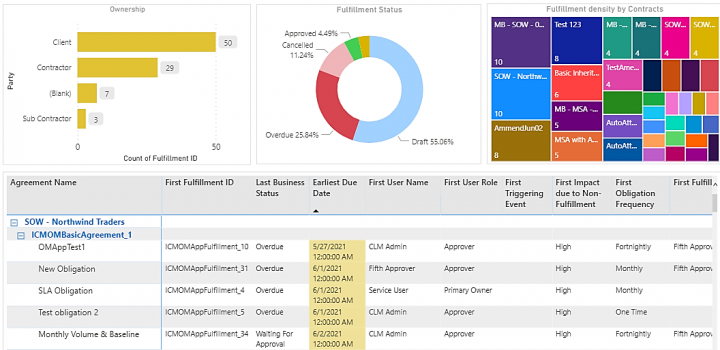
There are different reports that can be generated for different entities of the OM App data model, using the entity-specific capabilities provided as part of ICI:
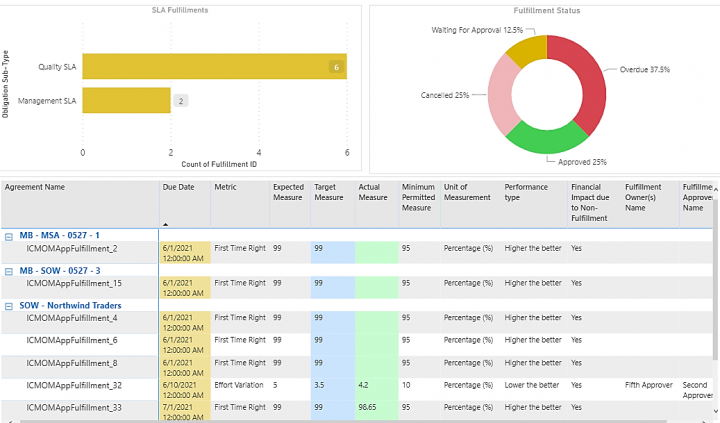
Some examples of these reports are as follows:
Example 1: Compliance Dashboard
Example 2: Upcoming Milestones
Example 3: Fulfilment Explorer
Example 4: SLA Tracking
Creating Obligations using Bulk Actions
You can add existing agreements with obligations using Bulk Actions tile.
1. Click the “Bulk Actions” tile.
 2. Click Update Existing tile. The Update page opens. 3. Select the Bulk Upload Action. For example, Add Association To Agreement. 4. Select the Saved Search. For example, All Agreements. 5. Select the Contract Type Name. For example, ICIMSA_OM. 6. Select the Association. For example, ICIOMAppObligation. 7. Click Next. 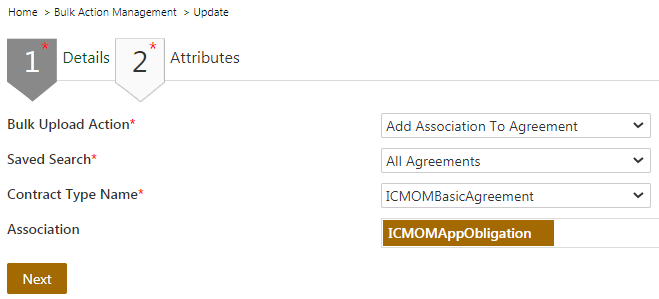 8. Select an attribute from the Available Attribute list as per your requirement. 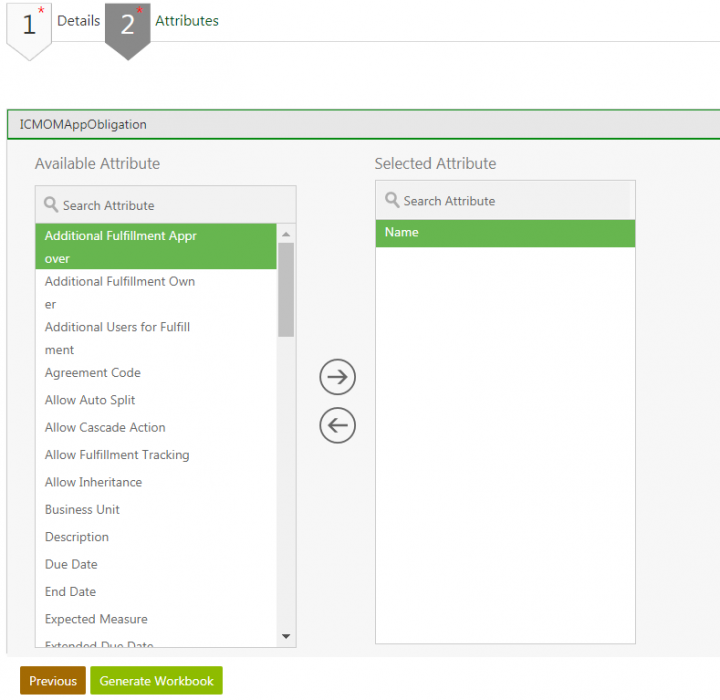 9. Click Generate Workbook. 10. Add the attribute values in the Workbook. 11. Save the Workbook. 12. Click Add Batch on the Bulk Action Management page. 13. Enter a Batch Name. For example, Obligation_MSA. 14. Select the Data file. 15. Click Add. 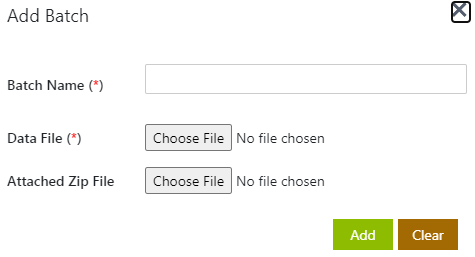 Agreements are now created in bulk with the added Associations.
Obligation Library
Overview
ICI Obligation Management provides multiple ways to discover and create obligations, and users can automatically attach obligations as associations to agreements and amendments based on defined event rules.
The auto-attachment functionality, derived from the core ICI, supports all configurations of associated document contract types including those which may have mandatory attributes.
OM App users can:
- Configure obligation-specific attributes in the “Standard Document Master” Contract Type.
- Define and maintain a list of Standard Document master records, which use the obligation attributes, and that will be treated as the “Obligation Library”.
- Utilize this Obligation Library by defining rules and library structures, to auto-create obligations.
- Maintain the Obligation library by updating and deleting Standard Document records as required.
- Create Saved Search to define applicable obligations, for example, creating a list of Standard Document Master records as GDPR obligations and using it to auto attach in agreements.
Note: The auto-associations supports only parent child type associations for agreements and amendments.
In the following sections, we will walk through the processes involved in triggering and using this feature to auto-attach obligations to agreements. An agreement with the contract type “Master Agreement” was previously created, in order to demonstrate the required processes, configurations, exhibits and steps.
Creating the Obligation Library
Once the “Standard Document Master” and the framework for the Obligation Library have been configured, we will create obligation records and define saved searches, in order to create the actual library.
Creating Obligation Records
After configuring the “Standard Document Master” for obligation, the next logical phase is to create masterdata records for obligations, or, in other words, the Obligation Library.
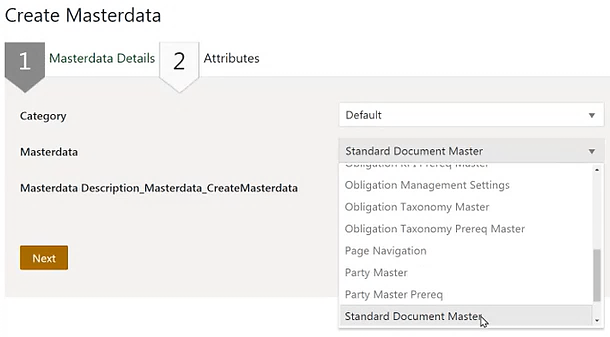
1. Click “Configuration” tile > “Create Masterdata”, the “Create Masterdata” page opens, with the “Masterdata Details” tab open, where the “Category” field is preselected as “Default”
2. Select “Standard Document Master” from the “Masterdata” field dropdown.
3. Click “Next”, the “Attributes” tab opens.
4. Enter an appropriate name in the “Name” field, and select “Obligation” from the “CT Name” field dropdown. All the seeded masterdata attributes (fields) for Obligation gets populated.
Note: All dependent attributes of obligation are displayed per masterdata configuration.
5. Fill out the form, including the mandatory fields.
6. Click “Save”.
Validating the Obligation Records
On creating a planned set of such obligation records, the Obligation Library gets created. To validate and locate the number of obligation records created for the library:
1. Click on the Search button.
2. Enter and search for “Standard Document Master” in the “Select Entity Name” field dropdown. This will display the records from the masterdata, which is the source library.
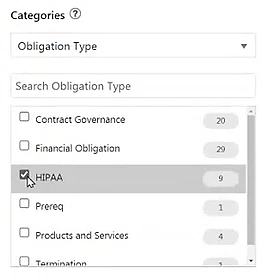
3. In the “Categories” field on the left pane, type “CT Name”, and Select “Obligation” checkbox. The total number of obligation records in masterdata will be displayed.
Defining Saved Searches
Once obligation records are created, we need to predefine a list of obligations by defining saved search. To demonstrate this with an example (“Obligation Type” = “HIPAA”):
1. For the list of obligation records (CT Name = Obligation), select “Obligation Type” = “HIPAA”.
A filtered list of obligation records related to HIPAA compliance is displayed.
2. Click the “Save” floppy disk icon on the right of “My Saved Searches”, “Save Search” opens.
3. In the “Save Search” popup window:
a. Enter a desired name in the “Save search as” field, in this case “HIPAA obligations”.
b. Activate the “Global Search” toggle button as “Yes”.
c. Fill any desired value in the remaining fields.
d. Click “Save”.
e. Click “OK”.
Amongst all the obligations in the library, the ones related to HIPAA compliance (“Obligation Type” = “HIPAA”) have now been predefined.
Auto-Instantiating Obligations
Now, with the Standard Document Master pre-configured, the Obligation Library predefined (with saved search), and event rules configured, it is time to apply the final trigger for obligations to automatically reflect on the Agreement.
1. Navigate to the pre-created agreement (Draft) with “Master Agreement” contract type, and click the view eye icon, the agreement with “Draft” status opens.
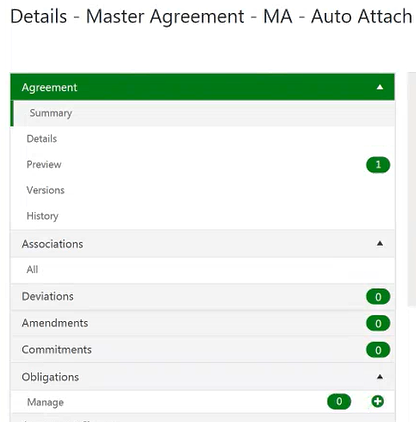
The number of Obligations is shown as zero at this stage for the “Draft” agreement.
2. Click “Send for Approval”.
When the agreement goes through approval, the obligation event rule gets triggered and creates target objects automatically from a predefined list of obligations. There is a processing time during which a notification is displayed: “The agreement is being transitioned to the next state”.
3. Click on the “Refresh” button to refresh the agreement page and process to the auto-instantiated state showing obligations, as evident by the number displayed on the left pane.
Note: It might take a few rounds of refreshes for obligations to take effect and display. Eventually, all the auto-instantiated obligations get reflected on the agreements.
Glossary
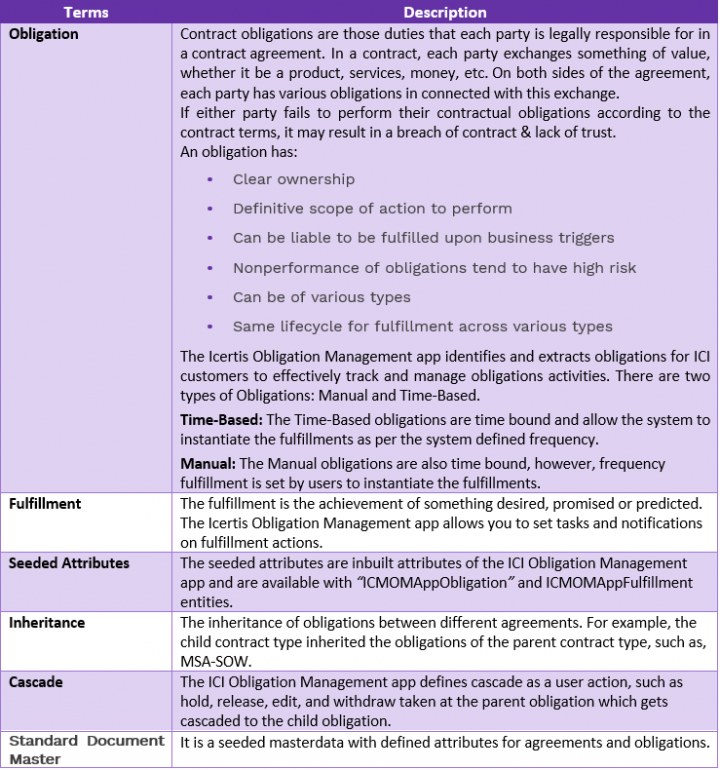
Some key terms and concepts introduced with the ICI Obligation Management App:
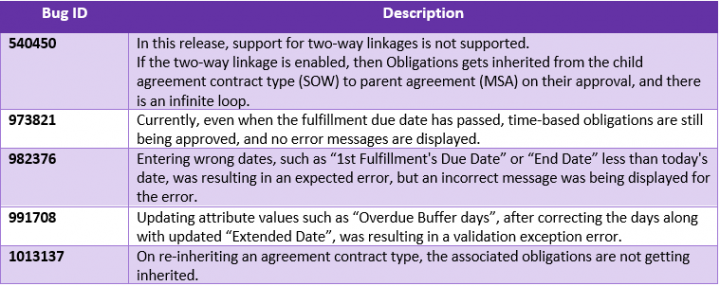
Known Issues
|
|
|


