Contents
Managing Security Groups
Search a Security Group
In ICI, you can search a security group for multiple reasons such as:
- To know the details of the security groups.
- To edit security groups.
You use multiple parameters to search the security groups.
Here is the process to search for a security group.
In ICI, you can use various options given below, including the dynamic search feature, to find the desired security group.
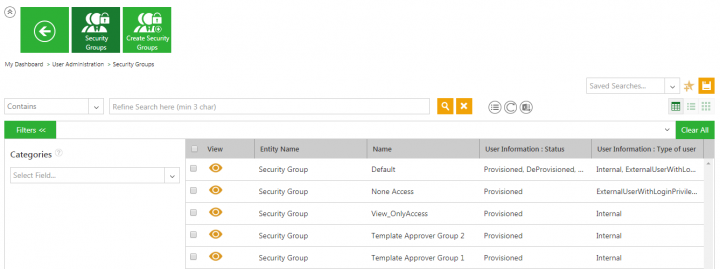
1. Click the Security Group on the User Administration page. The Security Groups page opens.
2. Search for a specific security group by using any of the following options:
- Click the Select Field list under Search For, and then select an appropriate item. Search results relevant to that item are displayed with a number in bracket.
The number denotes the number of security groups that meet the search criteria. - Click the box to select specific item. A list of security groups relevant to the item is displayed.
- Type relevant keyword in the Custom Keyword box, and click Apply to narrow your search further.
Alternatively, type the keywords in the box provided. A list of relevant security groups is displayed.
Enhancing your search
You can further narrow your search by using any of the following methods:
| Field | Action |
|---|---|
| "..." | Type the search term in double quotation marks. It shows existing security groups that include the exact search term. |
| *...* | Type the search term in star characters. It shows existing security groups that include the exact search term. |
| *... | Prefix * to the search term. It shows existing security groups that end with this term. |
| ...* | Suffix * to the search term. It shows existing security groups that start with this term. |
Viewing the saved search terms
View your saved search terms with the following:
- In the More Searches box, select your saved search, and click the Add to Favorite to mark the search term as favorite.
- You can find your marked favorites below the tiles.
Create a Security Group
You can create a group of users and assign specific privileges to the group. You can provide access to various KPIs and reports.
You can also grant view, manage privileges to various entities in ICI.
To create a Security group:
1. Click the Security Groups tile on the User Administration page. The Security Groups page appears.
2. Click the Create Security Group tile. The Create Security Group page appears. Enter the information for the following in the Create Security page.
3. The Create Security page consists of following tabs:
- Details
- KPI
- Report
- Users
- Privileges
- Verify
These tabs are explained here in detail:
Details
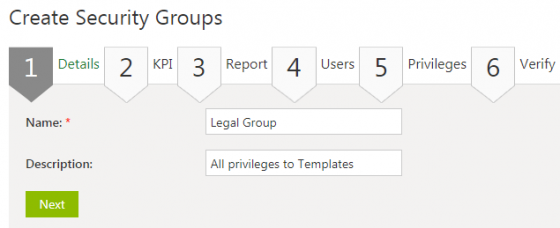
1. Enter the group related information in the Details page.
2. Type the name of the group in the Name box,.
3. Type a description for the group in the Description box.
4. Click Next. The KPI tab appears.
Provide access to various Key Performance Indicators (KPI) for selected group on the KPI tab.
The KPI column displays a list of various KPI's used in the system:
- View- Click the radio button to allow the user to view the particular KPI feature.
- None- Click the radio button to prevent the user to view the particular KPI feature.
Click Next to go to Report page.
Report
On the Report tab, you can provide access to various reports of the Key Performance Indicators (KPI) for selected group.
The Report tab consists of following columns:
- Reports- Displays a list of various KPI's used in the system.
- View- Click the radio button to allow the user to view the report of a particular KPI feature.
- None- Click the radio button to prevent the user to view the report of a particular KPI feature.
Click Next, the Users page appears.
Users
On the Users tab, add users to the group as follows:
- Click the Add icon, the Add User/ User Group screen pops up.
- Select a user from the user tiles. You can use scroll arrows to browse through the user tiles.
- Click Add.
- Click Next. The Privileges page appears.
Privileges
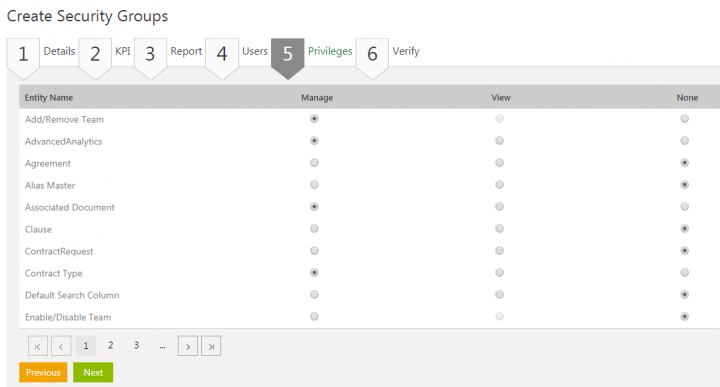
Use the Privileges tab to provide access to various entities like agreements, clauses, contract types etc. for the selected group.
The Privileges tab consists 4 columns:
- KPI- Displays a list of various KPI's used in the system.
- Under Manage, click the radio button to provide complete access to the user for a particular KPI feature.
- Under View, click the radio button to allow the user to only view a particular KPI feature.
- Under None, click the radio button to inhibit the user to from accessing particular KPI feature. Click Next. The Verify page appears.
Verify
Verify the details filled under each of the tab on the Verify tab. Click Previous to go back to respective tabs and click Save to create a Security Group.
The security group is saved.
Edit a Security Group
With ICI, you can create and edit security groups and provide privileges to the group members.
To edit a security group:
1. Click the Security Groups tile on the User Administration page. The Security Groups page appears.
2. Click the View Record icon to edit a security group. The Security Group Details page appears.
3. The Security Group page appears. Enter the information for the following tabs in the page.
- Details
- KPI
- Report
- Users
- Privileges
Details
Enter the security group related information in the Details tab.
1. Type the name of the group in the Name box.
2. Type a description for the group In the Description box.
3. Click Next. The KPI tab appears.
KPI tab
On the KPI tab, you can provide access to various Key Performance Indicators (KPIs) for selected users.
The KPI tab columns display a list of various KPIs used in the system.
1. Click the radio button under View ,to allow the user to view a particular KPI.
2. Click the radio button under None, to prevent the user from viewing the particular KPI.
3. Click Next. The Report page appears.
Report
You can provide access to Key Performance Indicators (KPI) reports for the selected security group from the Report tab.
The Report tab consists of following columns:
1. Reports- Displays a list of reports.
2. Click the radio button under View to allow the user to view the report of a particular KPI.
3. Click the radio button under None to prevent the user to view the report of a particular KPI.
4. Click Next. The Users page appears.
Users
On the Users tab, you can add users to the group:
1. Click the Add User icon. The Add User/ Distribution Group window opens.
2. Select a user from the user tiles. You can use scroll arrows to browse through the user tiles.
3. Click Add.
4. Click Next. The Privileges page opens.
Privileges
Use the Privileges tab to grant access to various entities like agreements, clauses, contract types etc. for the selected security group.
The Privileges tab consists of following columns:
1. Under Entity- Displays a list of entities used in the system.
2. Click the radio button under Manage to provide complete access to the user for a particular KPI feature.
3. Click the radio button under View to allow the user to only view a particular KPI feature.
4. Click the radio button under None to inhibit the user to from accessing particular KPI feature.
5. Click Next. The Verify page appears.
Verify
Verify the details filled under each tab on the Verify tab.
1. Click Previous to go back to respective tabs.
2. Click Update to update(i.e. save the changes) the Security Group.
Thus, you can modify the view and edit privileges allocated to a security group from Edit Security Groups.
Related Topics: Agreement Management | Managing Organization | Managing Users | Managing User Groups | Application Settings | Notification Settings | Currencies | Reasons | Search Sync | Legacy Upload |


