Contents
SSO Configuration
What is SSO Configuration?
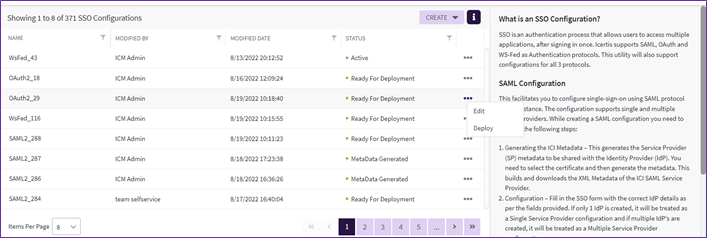
SSO is an authentication process that allows users to access multiple applications, after signing in once. Icertis supports SAML, OAuth and WS-Fed as Authentication protocols. This utility will also support configurations for all 3 protocols.
Performing SSO Configuration
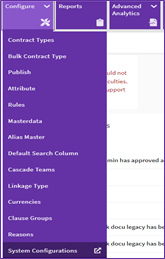
1. Click “Configure” tile and click “System Configuration”. The “System Configuration – Self-Service” tab will open.
Note:
- User needs to have manage access for “Self Service” security group privilege to view “System Configuration” option under “Configure” tile.
- User needs to have the manage access for “Self Service SSO Configuration” security group privilege to view the “SSO Configuration” option on the “System Configuration – Self Service” page. To know more about how to enable the self service option go to Enable Self-Service Option page.
WARNING!
The steps mentioned here must be performed by individuals with understanding and expertise of the SSO configuration process. If an incorrect configuration is deployed, users in your organization will not be able to access Icertis Contract Intelligence. If such an event occurs, you will need to contact us for support and rectification.
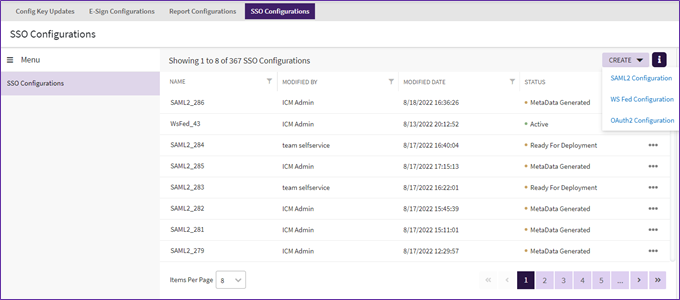
3. Click “Create” button, from the dropdown select the required SSO Configuration to be done from “SAML2 Configuration”, “WS Fed Configuration” and “OAuth2 Configuration”.
SAML2 Configuration
This facilitates you to configure single-sign-on using SAML protocol on the instance. The configuration supports single and multiple service providers. While creating a SAML configuration you need to perform the following steps:
- Generating the ICI Metadata – This generates the Service Provider (SP) metadata to be shared with the Identity Provider (IdP). You need to select the certificate and then generate the metadata. This builds and downloads the XML Metadata of the ICI SAML Service Provider.
- Configuration – Fill in the SSO form with the correct IdP details as per the fields provided. If only 1 IdP is created, it will be treated as a Single Service Provider configuration and if multiple IdP’s are created, it will be treated as a Multiple Service Provider configuration.
- Deploy – Once the configuration is complete, it will be pushed to the instance and updated at the required locations.
How to perform SAML2 Configuration
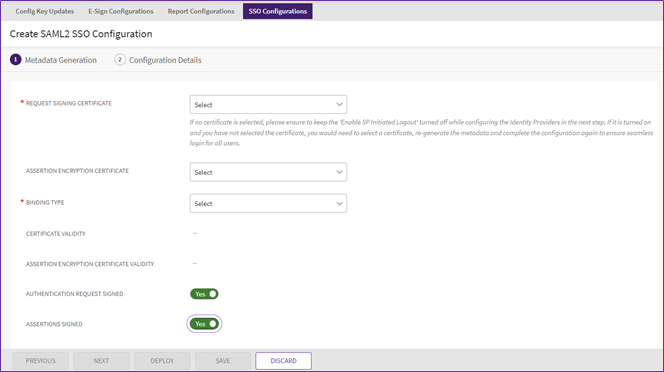
4. From the “Create” dropdown click “SAML2 Configuration”. The “Create SAML2 Configuration” page will open.
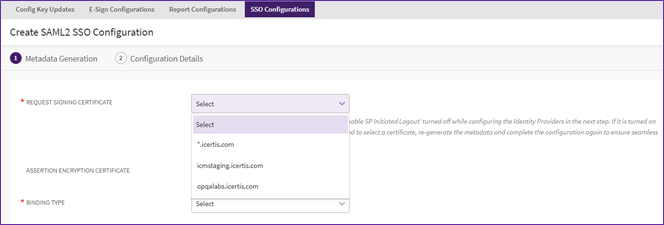
5. Select the “Request Signing Certificate” from the dropdown.
- For Non-Prod Instance Select - icmstaging.icertis.com
- For Prod Instance Select- *.icertis.com
- In case there are any custom certificates installed on that instance, that can be selected
6. “Assertion Encryption Certificate” is auto selected by the system depending upon “Request Signing Certificate” selection option
- For Non-Prod Instance Select - icmstaging.icertis.com
- For Prod Instance Select- *.icertis.com
- In case there are any custom certificates installed on that instance, that can be selected
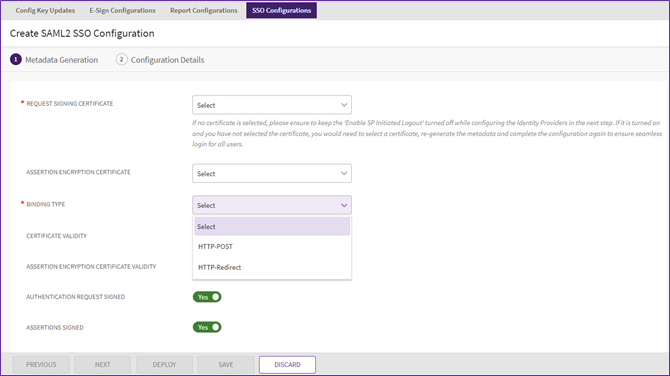
7. Select the “Binding Type” from the dropdown.
- HTTP Post - Select this for authentication and single log-out requests for exchanging requests and responses. HTTP POST enables SAML protocol messages to be transmitted within an HTML form by using base64-encoded content. ICI mandatorily expects SAML Response over HTTP POST.
- HTTP Redirect - Select this if the data is being transferred in the query parameters. ICI will send SAML Login and Logout requests to IdP over Http Redirect binding.
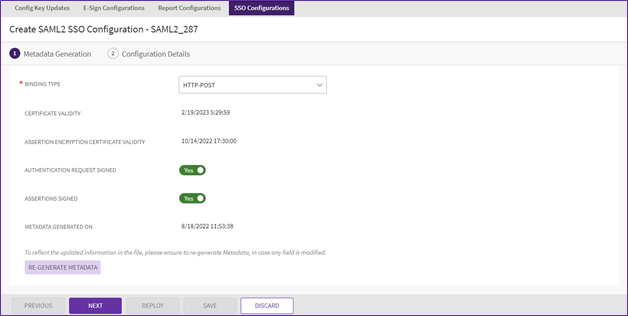
8. Toggle the “Authentication Request Signed” and “Assertions Signed” switch as required.
9. Click “Generate Metadata” button once all the necessary fields are filled. The Metadata file will get downloaded in the system.
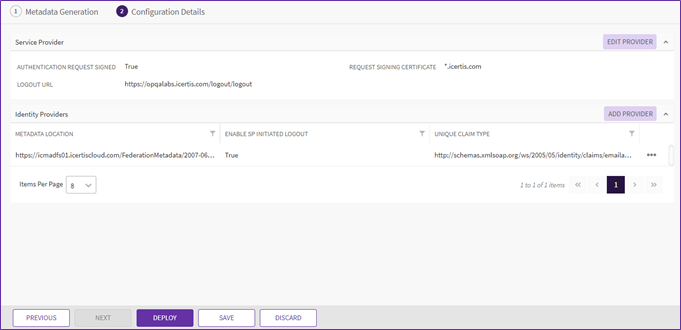
10. Click “Next”. The next page to add “Service Provider” and “Identity Provider” will open.
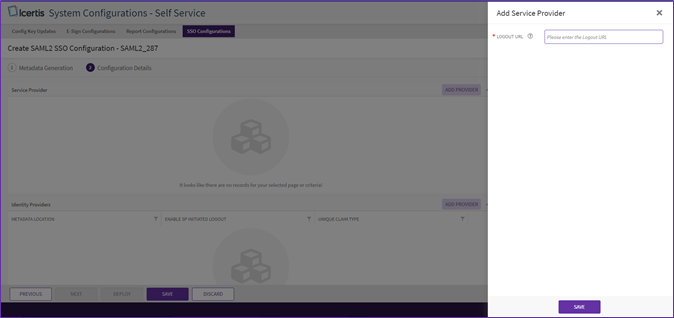
11. To add a “Service Provider”, click “Add Provider” button next to “Service Provider”. The “Add Service Provider” drawer will open.
12. Enter the “Logout URL”. Click “Save”.
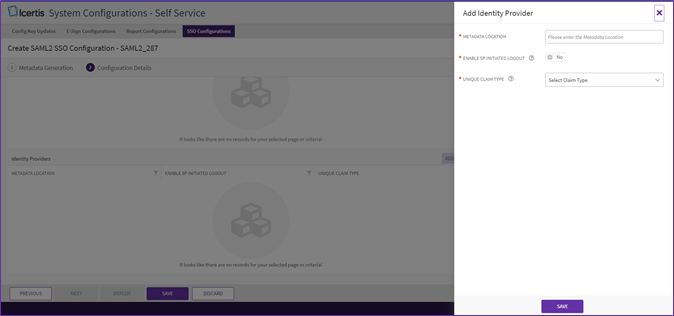
13. To add an “Identity Provider”, click “Add Provider” button next to “Identity Provider”. The “Add Identity Provider” drawer will open.
14. Enter the “Metadata Location”.
15. Toggle the “Enable SP Initiated Logout” switch.
16. Select “Unique Claim Type” from the “Select Claim Type” dropdown. (Refer the SSO IRD)
- Unique Claim Type - named identifier - Provide a claim type that uniquely identifies the IdP user. The IdP provides the claim type with a unique value. This claim type will be used by ICI to provision users based on their value
17. Click “Save”. The drawer will close.
18. Once both “Service provider” and “Identity Provider” are added. Click “Save”. The SAML2 Configuration will be configured.
19. Click on “Deploy”. The “Add External UPN” drawer will open, and pass External UPN of a user who has admin access preferably so that they can login with the new configuration and use the ICI bulk upload capability to update the External UPN of all the other required users
WS-Fed Configuration
This facilitates you to configure single-sign-on using WS-Fed protocol on the instance. While creating a WS-Fed configuration you need to perform the following steps:
- Configuration - Fill in the SSO form with the correct IdP details as per the fields provided.
- Deploy – Once the configuration is complete, it will be pushed to the instance and updated at the required locations.
How to Perform WS-Fed Configuration
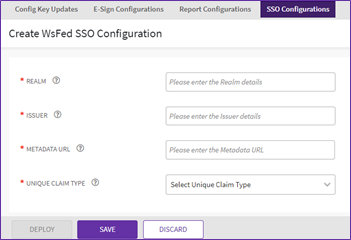
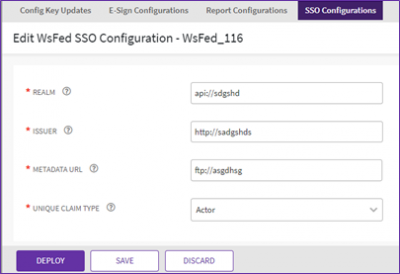
- Enter the “Realm” details, “Issuer” details, “Metadata URL”.
- Realm: This name is the unique identifier that is included in assertions sent to federation partners.
- Issuer: Specifies the URL at which the IdP or service provider is providing WS-Federation services.
- Metadata URL: The URL where metadata document is hosted, to be shared with Icertis.
20. Select the “Unique Claim Type” from “Select Unique Claim Type” dropdown.
21. Click “Save”.
OAuth2 Configuration
This facilitates you to configure single-sign-on using OAuth protocol on the instance. While creating an OAuth configuration you need to perform the following steps:
- Configuration - Fill in the SSO form with the correct IdP details as per the fields provided.
- Deploy – Once the configuration is complete, it will be pushed to the instance and updated at the required locations.
How to perform OAuth2 Configuration
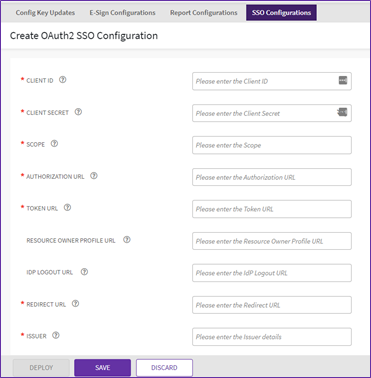
22. Enter “Client ID”, “Client Secret”, “Scope”, “Authorization URL”, “Token URL”.
- Client ID: Identifies the client that is making the request. The Client ID obtained from the IdP after registering application with OAuth server and will be provided by IdP.
- Client Secret: Identifies the client secret that is making the request. The client secret obtained from the IdP after registering application with OAuth server and will be provided by IdP.
- Scope: Mechanism to limit an application's access to a user's account. An application can request one or more scopes. This information is then presented to the user in the consent screen, and the access token issued to the application will be limited to the scopes granted.
- Authorization URL: The URL to which ICI will send the Authorization Code request.
- Token URL: The URL to which ICI will send an Authorization Code to get an access token from IdP.
23. Enter the “Resource Owner Profile URL”, “IDP Logout URL”, “Redirect URL” and “Issuer” details.
- Resource Owner Profile URL: The URL provided by IdP, which ICI will use to retrieve extra information about the user. This is an optional field.
- IDP Logout URL: The URL provided by IdP to which ICI will send the logout request message.
- Issuer: The OAuth issuer URL.
24. Enter “Provider” details and “Post Logout Redirect URL”.
25. Select “Respond Mode” from “Select Response Mode” dropdown.
26. Select the required “Response Type”.
- Response Type: Informs the Authorization Server of the mechanism to be used for returning Authorization Response parameters from the Authorization Endpoint. 'Code' indicates requesting an authorization code, 'Token' indicates requesting an access token (implicit/grant).
27. Enter “Tenant” details and “Policy ID”.
28. Select the “Unique Claim Type” from “Select Unique Claim Type” dropdown.
29. Click “Save”
Deploying SSO Configuration
Once the configuration is ready for deployment, user will be able to deploy the current configurations
1. Click “Deploy” from the three dots menu, user will be asked to enter external UPN of its current user.
Once the user enters the external UPN and clicks on deploy the configurations, the configuration will get deploy on the server which will change the SSO type appointing to the new configuration.
Editing SSO Configurations
1. Click three dots next to the SSO configuration you want to edit, on the SSO Configuration index page.
2. The Edit SSO Configuration page will open, make the required edits and click “Save”.
